Daring Bakers and a Classic


    It's time again for another monthly Daring Bakers challenge, this time hosted by Meeta of What's for Lunch Honey? and Tony of Tony Tahhan. I was away on vacation when the recipe was announced so Helen quickly emailed me to tell me that this month's challenge was going to be Pierre Herme's chocolate eclairs. The first thing I thought was "my family and friends are going to love this" and my second thought was, "I better not mess up a classic!".


    For a few days I thought about different flavor possibilities although I knew I wanted to keep part of the recipe as it was given to us with the chocolate pastry cream. I still have quite a bit of matcha in my pantry so I decided to make some green tea eclairs and profiteroles in honor of the other great parisian patissier Sadaharu Aoki, who is also turning fairly new ingredients into classics.


    I made two different pate a choux recipes by keeping one plain and infusing the other one with green tea. I did the same with the pastry cream fillings by adding chocolate to one batch and green tea to the other. I played around with the presentations as well, making a chocolate religieuse with cocoa nib tuile and ice cream filled profiteroles with warm chocolate sauce using some leftover honey ice cream I had from the mamia post last week.


    A big thank you to Meeta and Tony for hosting this month's challenge. Please visit their websites for the recipes and also go here to check out the Daring Bakers blogroll.

Post Title

Daring Bakers and a Classic


Post URL

http://mercymadame.blogspot.com/2008/08/daring-bakers-and-classic.html


Visit Merci Madame for Daily Updated Wedding Dresses Collection

Chocolate Macarons and a Tropical Storm


    This is what happens in my family when we are stuck indoors for hours on end due to bad weather. We eat, cook, bake and eat some more... and we particularly like to eat chocolate. Call it emotional eating, but we cannot help ourselves.

    Last Monday, we were hit by tropical storm Fay and although we didn't get significant damage in our area, some communities north of us were impacted pretty badly. It rained heavily, we had five tornado warnings in a row and the wind blew strong for a few hours. Luckily, we did not lose power so we were able to enjoy a cozy afternoon with movies and lots and lots of baking.


    After all the ice creams and custards I had made prior to the storm, I had an enormous bowl of egg whites in my refrigerator that needed to be used. I always find that macarons are the best way to use up all the egg whites because everyone I know loves them and nothing will ever go to waste.

    This time I had to fulfill my neighbors' request for chocolate macarons with salty peanut butter cream, but I also saved some for me to fill with milk chocolate and passion fruit ganache. One for you, one for me.

    I really wanted to call this post "Anatomy of a Macaron" because I wanted photograph close ups of what the macaron feet should look like, the bottom of the macaron, the before and after... This week a reader that emailed me about macaron was able to successfully replicate them in her own kitchen, which definitely makes my day. It's hard to explain all the little details in an email but she mastered it.


    Chocolate Macarons

    100 grams egg whites
    25 grams sugar
    1/2 tsp lemon juice
    225 grams powdered sugar
    125 grams almond flour
    15 grams cocoa powder
    pinch of salt
    Cocoa nib for topping


    Separate the egg whites at least 24 hours prior and even let them sit at room temperature for a few hours before starting to make the macarons. This will help them get rid of some moisture and become more acidic, which will help form a stable meringue.

    Whip the egg whites and the lemon juice until they are almost fully whipped. Sprinkle in the sugar while still mixing. Continue to whip to a full meringue.

    Sift the powdered sugar, salt, almond flour and cocoa powder into a bowl. Add the meringue into the dry ingredients and fold until a shiny mass is formed. We want it to spread a bit but not too much.

    Pipe the macarons onto a silicon mat and sprinkle with cocoa nibs. Let the macarons dry at room temperature for 20 minutes or so. Bake them in a 300F for about 8 minutes. Rotate the sheetpan and bake for another 8 minutes.


    Salty Peanut Butter Filling

    125 grams creamy peanut butter
    70 grams powdered sugar
    25 grams softened butter
    25 grams heavy cream
    5 grams vanilla extract
    3 grams fine sea salt


    Cream all ingredients together for a smooth filling.

    Milk Chocolate and Passion Fruit Ganache

    100 grams milk chocolate
    40 grams passion fruit puree
    20 grams heavy cream
    15 grams butter


    Chop the milk chocolate into small pieces. Boil the passion fruit and heavy cream together and pour over chocolate. Stir until incorporated and the ganache forms. Wait a couple of minutes for the ganache to cool a bit and add the softened butter. Stir to create and emulsion. Let it harden a bit until it is pipeable and fill the macarons.

Post Title

Chocolate Macarons and a Tropical Storm


Post URL

http://mercymadame.blogspot.com/2008/08/chocolate-macarons-and-tropical-storm.html


Visit Merci Madame for Daily Updated Wedding Dresses Collection

The Dairy Experiments: Mamia


    After the fun we had with the petit suisse experiment, Helen and I decided to try another experiment together. When she asked me what I wanted to do this time, I instantly told her about mamia, a traditional Basque dessert, which Helen had tasted years ago in one of her trips to the French Basque Country. She mentioned she wanted to attempt to replicate her father's favorite cheese, faisselle, which she said is very similar to mamia.

    These experiments are very much driven by childhood memories and nostalgia. Here she was wanting to make her father's favorite cheese and here I was, remembering the times my father used to take me up to the mountain of Gorbea to visit a sheep herder he knew.

    Mamia, also known as gatzatua or cuajada in other parts of Spain, is a creamy dessert made from ewe's milk. Very similar to yogurt in texture, but completely different taste. Mamia is mild and not acidic. It used to be a very seasonal product since ewe's milk was only available during the spring months but nowadays, it is readily available in the yogurt aisle of many supermarkets. Although being able to eat mamia all year round is very convenient, I love the idea of waiting twelve months to enjoy something so precious. It was usually a neighbor or a close friend who brought us the ewe's milk and my mom would make the mamia for us. Always a treat, given and received with great love and appreciation.


    In theory, mamia is one of the easiest desserts one can make. Ewe's milk is heated, cooled to body temperature, a few drops of rennet are added, then poured into clay jars and left to coagulate. When we decided to do the experiment, I really wanted to see if I could find sheep's milk so I could replicate the dessert just as I remember it. I looked online and even called a couple of places but no one was selling it, so I settled for goat's milk. But this meant that some adjustments had to be made because goat's milk has a smaller milk solid and fat content than sheep's milk. I wanted to start by using goat's milk and rennet alone. Once I saw the result, I would be able me to make the necessary adjustments to compensate for the lack of fat and solid matter in the goat's milk.

    As I imagined, my first batch did not set properly. The milk was still fairly liquid after 12 hours, so I decided to add some dry milk and heavy cream to the goat's milk and proceeded as before. This time it worked and the milk set beautifully.


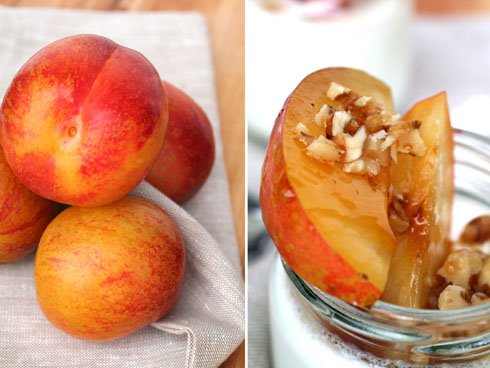
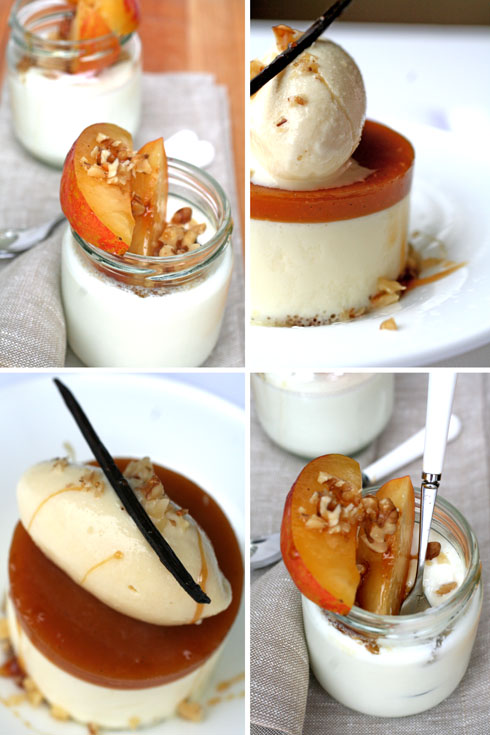
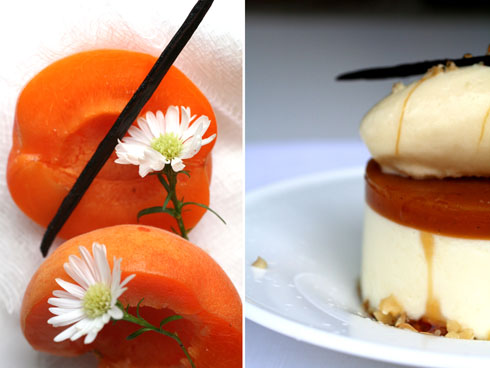
    Mamia is usually sweetened with honey or a bit of sugar and served with fruit compotes and nuts. This is exactly how I like it, simple and rustic. However, I wanted to reserve some to turn it into a more complex plated dessert using these traditional components as a basis. Mamia mousse, vanilla bean and apricot jelly, walnut nougatine crust and acacia honey ice cream.

    Mamia

    500 ml goat's milk
    50 grams heavy cream
    30 grams dry milk powder
    pinch of salt
    liquid rennet


    Place the goat's milk with the heavy cream, dry milk powder and salt in a medium saucepan. Bring it up to a boil. Remove the pan from the heat and let the milk come down in temperature to 37C, which is about body temperature.

    Place 3 drops of liquid rennet into 4 ramekins or glass jars. Divide the milk amongst the jars. Do not stir or move the jars. Let the milk set for an hour at room temperature until it sets and then refrigerate. They will stay good in the refrigerator for about 3 days.

    Mamia Mousse

    2 egg yolks
    35 grams sugar
    250 grams mamia
    2 grams gelatin sheets
    100 grams heavy cream, soft peaks


    Whip the yolks with an electric mixer. In the meantime, cook the sugar with a bit of water to reach 240F. Pour the cooked sugar into the yolks and keep whipping until it thickens and it is cool to the touch.Fold in the mamia into the yolks.

    Soften the gelatin in ice water for about 5 minutes. Melt the gelatin over a double boiler and add it to the egg yolk mixture while whisking so it doesn't set right away. Fold in the soft peak heavy cream. Pipe the mixture into the molds and refrigerate until it sets.

    Honey Ice Cream

    750 grams milk
    75 grams heavy cream
    165 grams acacia honey (or any honey you have available)
    75 grams sugar
    8 egg yolks
    pinch salt


    In a medium saucepan, bring the milk, heavy cream, salt and sugar to a boil. In the meantime, whisk the egg yolks with the honey. temper the boiling milk into the egg yolks and whisk. Place the ice cream base back in the pan and cook until it thickens slightly or to 84C.

    Strain through a fine sieve and chill over an ice bath. Refrigerate the ice cream base overnight and churn in an ice cream machine. Freeze.

Post Title

The Dairy Experiments: Mamia


Post URL

http://mercymadame.blogspot.com/2008/08/dairy-experiments-mamia.html


Visit Merci Madame for Daily Updated Wedding Dresses Collection

In The Kitchen with Pia


    A few weeks ago, one of my favorite bloggers, Pia Jane Bijkerk contacted me to see if I would be interested in being a guest blogger in her section called "Kitchen". I immediately accepted. How could I not! I have been a fan of Pia's work for a while now. Her photography, styling, writing, vision and warmth make her blog one of the most inspirational and interesting everyday reads. As the header says, "Enhance the Everyday". Indeed you do Pia. I hope we make time to collaborate in future projects. Thank you!

Post Title

In The Kitchen with Pia


Post URL

http://mercymadame.blogspot.com/2008/08/in-kitchen-with-pia.html


Visit Merci Madame for Daily Updated Wedding Dresses Collection

For Jill


    I am very excited to announce that I am now a contributor for my dear friend Jill's new blog, which is dedicated to chronicle and document her journey in the recovery from autism of her 9 year old son Connor. I will be developing gluten, casein and soy free recipes, such as these blueberry crumb bars and chocolate chip cookies.

    Jill has been asking me to do this for years now, but I was always hesitant and afraid because I was not familiar with the necessary ingredients and methods involved in gluten free baking. I am still far from really understanding all the properties of gluten free grains but this will be a great start for me.

    Connor was unofficially diagnosed with autism when he was about 18 months old. I have to admit that it took me a long time to really understand all that is involved in raising an autistic child. We moved away from Connor shortly after they discovered it, but Jill always kept me informed of the progress and every new thing they were learning. She researched, tried alternative medicine, behavioral therapies, diets, biomedical therapies... she has been relentless in trying to cure Connor. The entire family started a gluten, casein and soy free diet and as Jill can probably confirm, this was difficult at first but has delivered great results and has become a part of their everyday lives.

    So with these new recipes for her blog, I would like to encourage all of those with food allergies to get back in the kitchen to bake. The recipes will be simple, quick, very different from Cannelle Et Vanille, but still very rewarding for me.


    I am shipping the raw cookie dough and the blueberry crumb bars to Jill so the entire family will be able to taste them. There is nothing better than a fresh, out of the oven cookie so I have to ship the cookie dough raw so she can bake cookies as she needs them.

    Please check out her blog for these recipes and pass along her blog address to anyone you might know that needs information regarding autism. She is an endless pool of information. Honestly, my hero.


Post Title

For Jill


Post URL

http://mercymadame.blogspot.com/2008/08/for-jill.html


Visit Merci Madame for Daily Updated Wedding Dresses Collection

Pink Grapefruit, Champagne and Henry Mancini's "Moon River"


    Have you ever been so inspired by a song that random creations come over you unexpectedly? It happened a few days ago when I was diving by myself to an appointment. My iPod was set to shuffle songs and some strange coincidence happened when three songs with the word "moon" played back to back. Henry Mancini's "Moon River" played first, followed by Nick Drake's "Pink Moon" and Morrissey's version of "Moon River".

    These songs remind me of my early twenties when I used to sit on my bed at night looking out my window. Morrissey's voice is so soft and gentle... and Nick Drake's tragic life always made me a bit sad, but a happy sad, if that makes any sense. Immediately, I had visions of champagne, pink, bubbles and ice, stars, driving at night, something sweet, something sour... just like "Breakfast at Tiffany's".


    This plated dessert came to me like that, in an instant. It's a pink grapefruit and champagne sorbet on top of lemon and verbena curd with lemon streusel and red currant jelly. The sorbet is quite unusual with the use of egg yolks and butter. I adapted it from another champagne sorbet recipe that came via my former chef. The lemon curd is enhanced with some verbena from my garden and I love the tartness of the red currant jelly. The sorbet can be served in small frozen shot glasses as a great intermezzo for a multiple course meal or as an elegant pre-dessert.


    Pink Grapefruit and Champagne Sorbet

    500 grams champagne
    250 grams pink grapefruit juice
    200 grams sugar
    4 egg yolks
    50 grams unsalted butter, room temperature
    2 sheets of gelatin
    a couple of drops of all natural red food coloring, optional


    In a medium saucepan, heat the champagne, pink grapefruit juice and the sugar. In a separate bowl, whisk the egg yolks. When the liquids come to a boil, temper it into the egg yolks. Return this mixture to the pan and cook to 84C. Remove the pan from the heat and strain the sorbet base into a clean bowl. Add the softened gelatin and whisk.

    Place the bowl over an ice bath and cool the sorbet base. When it is cool to the touch, add the room temperature butter and whisk it in. We want both the butter and the sorbet base to be at the same temperature to create an emulsion. Add food coloring if desired.

    Place the sorbet base in the refrigerator overnight. The next day, whisk and churn in ice cream machine. Freeze.

    Lemon Streusel

    100 grams butter
    100 grams sugar
    100 grams almond flour
    100 grams all purpose flour
    1/2 tsp lemon oil
    Zest of half a lemon


    Cream together the butter and the sugar. Add the flour, almond meal, lemon oil and lemon zest and mix until a dough is formed. Form the dough into a disk and wrap it in plastic wrap. Freeze the dough and when it is solid, grated it with a grater. Bake in a 325F oven until lightly golden.

    Lemon Verbena Curd

    120 grams whole eggs
    40 grams sugar
    70 grams lemon juice
    Zest of 2 lemons
    4 leaves of lemon verbena


    Whisk together all the ingredients and cook them over a double boiler until the eggs thicken. Strain through a fine sieve and chill over an ice bath.

    Red Currant Jelly

    100 grams red currant puree
    10 grams sugar
    1 sheet of gelatin


    Heat the red currant puree and the sugar together. Soften the gelatin in ice water for 5 minutes, squeeze out any excess water and add it to the hot puree. Whisk and pour into your mold. Refrigerate until it solidifies and cut as desired.

    And can I ask... what songs inspire you?

Post Title

Pink Grapefruit, Champagne and Henry Mancini's "Moon River"


Post URL

http://mercymadame.blogspot.com/2008/08/pink-grapefruit-champagne-and-henry.html


Visit Merci Madame for Daily Updated Wedding Dresses Collection

Stèphane Glacier's Delice D'Ete


    I bought pastry chef Stèphane Glacier's latest book a couple of months ago and I am fascinated with all the amazing verrines and petits gateaux that are featured in it. This gateau, with pistachio joconde layers soaked with lemon simple syrup, jellyfied raspberry coulis and vanilla bavarian cream, holds true to its name, Delice D'Ete (Summer Treat). Light, spongy and perfect for the season.

    Although the recipes I used for the different gateau components are all from my archives, this cake was inspired by chef Glacier, which brings up a question that always roams around in my head... What makes a chef own a recipe? We all borrow ideas from others, so when can we call a recipe our own?

    In this case, although the recipes are mine, the idea, look and combination of flavors are chef Glacier's, so would you say this cake is mine or his? It's hard to claim ownership of recipes sometimes. In this case, it is clear that all credit should go to him. Composition, combination, styling... They are all his.


    Pistachio Joconde

    105 grams almond flour
    105 grams raw pistachios
    150 grams powdered sugar
    50 grams all purpose flour
    250 grams eggs
    185 grams egg whites
    75 grams sugar
    35 grams butter, melted and cooled


    In a food processor, finely chop the pistachios. Add the powdered sugar and almond flour and process until a fine meal forms. Place this mixture in a bowl of an electric mixer and add the all purpose flour and the whole eggs to it. With a whip attachment, whip this mixture until a thick ribbon forms, about 5 minutes. Transfer this mixture to a large bowl and wash the electric mixer bowl and whip attachment.

    Place the egg whites in the bowl of the electric mixer and whip until a light meringue starts to form. Slowly, sprinkle in the sugar and whip until semi-stiff peaks form.

    Mix a third of the meringue into the first mixture. Add the rest of the meringue and fold gently. Add the melted butter and fold until it is all incorporated.

    Divide this batter into two half sheetpans and spread the batter into an even layer so when the cake bakes, it is even. Bake at 375 degrees for about 12 minutes or until it starts to form a light color on top. We don't want it to be too dark. Cool the cakes and store in the refrigerator or freezer until ready to assemble the cake.

    Lemon Simple Syrup

    100 grams sugar
    100 grams water
    Zest of half a lemon


    Place all ingredients in a small saucepan and bring to a boil. Turn the heat off as soon as sugar has dissolved. Cool.

    Jellyfied Raspberry Coulis

    800 grams raspberry puree
    160 grams sugar
    7 gelatin sheets


    Place the raspberry puree and the sugar in a saucepan. Bring to a boil. In the meantime, soften the gelatin in ice water. When the puree comes to a boil, turn the heat off and add the gelatin to it. Whisk so it dissolves evenly.

    Pour this coulis into two flat sheetpans and freeze until they are solid.

    Vanilla Bean Bavarian Cream

    500 grams half and half
    1 vanilla bean, scraped and seeded
    125 grams sugar
    120 grams yolks
    7 gelatin sheets
    500 grams heavy cream, soft peaks


    In a medim saucepan, place the half and half, the vanilla bean and half of the sugar and bring to a boil. In the meantime, whisk the yolks and the other half of the sugar in a bowl. Also, start softening the gelatin in ice water. When the half and half comes to a boil, temper into the yolks and whisk. Add this custard back to the pan and cook until it slightly thicken and coats the back of the spoon (about 84C).

    Strain this custard through a fine sieve into a clean bowl. Add the softened gelatin to it and whisk. Place this bowl over an ice bath so it cools faster. When it's cool to the touch, add the whipped cream and fold gently until it is all incorporated.

    Once the bavarian is made, the cake must be built so have all your other components ready.

    Assemble the Gateau

    I used a square frame to build the gateau. The frame is about 14 x 14 x 2 inches.

    First, remove the parchment paper from the bottom of the joconde. Do so by inverting the cake onto your work surface and peel off the paper gently, pressing the cake down as you peel the paper off. Then cut the joconde to fit the square frame. Also cut the gelified raspberry coulis to fit the frame.

    Place the square frame on top of a half sheetpan lined with parchment. Place the first sheet of joconde in the frame. Soak it with the lemon simple syrup. Pour some of the bavarian cream on top and spread evenly with an offset spatula. Place the first sheet of frozen gelified coulis on top and gently press down. Pour a very thin layer of bavarian on top and spread evenly. Place the second sheet of joconde on top. Brush with simple syrup. Pour another very thin layer of bavarian on top and spread evenly. Place the second sheet of frozen coulis and finish with the bavarian cream all the way to the top. Flatten the top with your offset spatula. Freeze the entire cake.

    When ready to serve, remove the cake from freezer and let it thaw out a bit before cutting it. Glaze the top with a neutral glaze and serve with berries.

    I think the best part about building a cake like this are the scraps, don't you think?

Post Title

Stèphane Glacier's Delice D'Ete


Post URL

http://mercymadame.blogspot.com/2008/08/stephane-glacier-delice-d.html


Visit Merci Madame for Daily Updated Wedding Dresses Collection

Chocolate Mille-Feuille


    I came back from my vacation thinking about recipes that require attention. I am eager to learn, touch, feel doughs, know temperatures... Recipes in which the environment plays a role, the way I handle the dough will make a difference. I have been dreaming of cheese making again, bread with levain and of course, pâte feuilletée or puff pastry.

    Ever since the Daring Bakers danish challenge, I couldn't stop thinking about making laminated doughs again. I have been obsessed with it. Call me crazy. Laminated doughs in the middle of the Florida summer can be a challenge but for some reason, this recipe was uncomplicated, much more so than the danish recipe. I didn't rush it and that made a difference.


    As you might know, I come from a family of pastry chefs. I grew up in the family pastry shop where puff pastry was made from scratch almost everyday. There were no freezers used back then and there are none today. My uncle Jose is a master at the art of pâte feuilletée and watching him work is a true pleasure. To this day, I believe a good pastry shop distinguishes itself by the quality of their laminated doughs such as mille-feuilles and croissants.

    This dough only has six ingredients but it requires about 2 days worth of mixing, rolling and folding. There are six letter folds that make this one of the flakiest pâte feuilletée I have ever made. The dough is elastic and if chilled enough in between rolling, it is quite easy to handle.

    I wish I could have taken photos of the process since that is the most important task with this recipe, but unfortunately, I couldn't because lighting was poor and because I had a toddler running around in the kitchen. Please visit Fanny's blog for great photos on how to roll and fold puff pastry.

    I made the dough, rolled it into two large rectangles and froze them until I was ready to bake them. With the first sheet I made the chocolate mousse and raspberry napoleons and reserved the second sheet to make palmiers, which are C.'s favorite pastries.


    Chocolate Pâte Feuilletée

    adapted from Pierre Hermes' "Chocolate Desserts"

    420 grams all purpose flour
    185 grams cold water
    2 tsp salt
    70 grams, unsalted butter, melted and cooled

    425 grams butter, slightly softened
    50 grams cocoa powder, sifted


    Place flour on a working surface and make a well in the center. Dissolve the salt into the cold water and add this to the center of the flour well. Slowly start mixing the flour and the water together with circular motions and always working in the center so the water is absorbed by the flour and we work neatly. When they are mixed, add the melted and cooled butter.

    Knead the dough for about 5 minutes. It will not be a super smooth dough at this point but don't worry because we will keep developing the gluten as we roll the dough. Wrap the dough in plastic wrap forming a rectangle that is approximately 6 inches long on one side. Refrigerate overnight.

    To make the lock-in butter, cream the butter with the paddle attachment until smooth but still cold. Add the sifted cocoa powder and cream until the cocoa is absorbed by the butter. Wrap in plastic wrap also forming a rectangle that is a bit smaller than the previous one. Refrigerate overnight.

    The next day, pull the dough out of the refrigerator and roll to a rectangle that is about 1 cm thick (1/3 inch) and about 30x18 cm long (12x7 inches). Remove the lock-in butter out of the fridge. It will be harder than the dough but we need to have both right about the same consistency, so pound the butter with a rolling pin to soften it slightly.

    Place the slightly softer butter on top of the right half of the dough rectangle. Fold the left side of the dough over the butter creating a packet. Seal in the edges. If necessary, press the dough down so the butter reaches every corner of the dough. We want the butter to spread evenly all over to create even layers. Place the dough on a sheetpan, cover it with plastic wrap and refrigerate for 2 hours.

    Remove the dough from the refrigerator and roll it to a rectangle that is 3 times wider than tall, about 52x18cm (7x21 inches). Fold the dough like a letter, bringing the right third over the middle third and folding the left on top of it. Wrap in plastic and refrigerate for 2 hours. This was the first turn and make sure to mark it somewhere so you don't lose track of how many folds you have done.

    Repeat this procedure 5 more times for a total of 6 letter folds, always rolling the dough with the open edges to the left and right of you. Refrigerate the dough after each turn. Use flour when rolling but brush off any excess after each turn to avoid getting too much flour on the dough. If the dough rips a bit and the butter is exposed, don't worry, try to patch it as well as you can but keep going. After all the folds are done, it will not matter that much.

    After the last fold, refrigerate the dough overnight. You can use it the next day or what I did was roll it into two sheets and froze them until I was ready to use them. This dough will be good in the refrigerator for a couple of days and up to one month in the freezer.

    Caramelized Chocolate Mille-Feuille with Chocolate Mousse and Fresh Raspberries

    Place a sheet of puff pastry on a sheetpan lined with parchment paper. Pre-heat oven to 450F. Sprinkle granulated sugar over the top of the puff pastry and place it in the oven. Reduce heat to 375F and bake for 10 minutes. After 10 minutes, place a cooling rack on top of the puff pastry to stop it from rising too much. Bake for an additional 10 minutes with the cooling rack on top of the pastry.

    Remove the sheetpan from the oven. Cover the puff pastry with a sheet of parchment paper and with the help of another sheetpan, flip it over. Remove parchment from the top and now, the sugared side will be on the bottom and the plain side will be facing you. Place this sheetpan back in the oven and bake for another 5 minutes. Remove from the oven and let the puff pastry cool.

    Cut the pastry into same size rectangles. Pipe two rows of chocolate mousse on top of a rectangle, place a row of fresh raspberries in the center and top with another layer of puff pastry. Decorate with fresh berries.

    Chocolate Palmiers

    Sprinkle granulated sugar on top of a sheet of chocolate puff pastry. Fold it just like a fan. Take the left side and fold it in the middle and the same with the right side. Then fold these two against each other creating a fan. Roll this log in granulated sugar and refrigerate for 15 minutes until it chills some more.

    Cut 1/2 inch pieces vertically. Press each palmier gently into granulated sugar (both sides). Place these on a sheetpan lined with parchment and bake in a 375F oven for 8 minutes. Turn the palmiers over and bake for another 8 minutes. Remove pan from oven and let the palmiers cool.

Post Title

Chocolate Mille-Feuille


Post URL

http://mercymadame.blogspot.com/2008/08/chocolate-mille-feuille.html


Visit Merci Madame for Daily Updated Wedding Dresses Collection

Saturn Nectarines, Red Currants and Raspberries


    I just returned from Colorado where I spent a week with close friends. It was a necessary vacation. Colorado always recharges my brain and re-energizes my body. Our friends Jill and Erik were kind enough to open their house to us one more time and we truly enjoyed their company.

    I am working on many new recipes but to start, I wanted something summery, light and fruity. I finally found red currants in the store and of course, I immediately thought of crumble. Saturn peaches and nectarines were also abundant and decided to combine them with the red currants and raspberries for a bit of tart, sweet contrast. I topped them with pistachio crumble and mace mascarpone cream.

    Saturn peaches remind me immensely of summer vacations at the beach. We call them "paraguayos" and they were always part of the snacks my mom used to pack for us in the cooler. Peaches, melon, tortilla de patata... Finished with an ice cream sandwich.


    Saturn Nectarine, Red Currant and Raspberry Crumble

    2 saturn peaches, peeled and diced
    50 grams red currants
    50 grams fresh raspberries (you can use frozen ones as well)
    10 grams sugar
    1/4 tsp nutmeg
    10 grams flour


    All these measurements can be slightly adapted depending on the sweetness of the fruit and its water content.

    Combine all ingredients in a bowl. Divide amongst ramekins. Top with pistachio crumble and bake at 350 degrees for approximately 20 minutes or until the filling starts to bubble.

    Pistachio Crumble

    100 grams unsalted butter
    100 grams sugar
    100 grams flour
    125 grams pistachios, chopped
    pinch of salt


    Cream all ingredients together in an electric mixer. It will be crumbly. Place on a cookie sheet or in an air tight container and refrigerate over night. I normally make a large batch and freeze it and then I bake what I need. Break little pieces and top the fruit filling with it.

    Mace Mascarpone Cream

    60 grams organic heavy cream
    60 grams mascarpone cheese
    15 grams sugar
    Pinch of mace


    Whip all ingredients until soft peaks form.


    On another note, my little boy got his first real haircut in Colorado. I miss his blonde curls but it was time. He spent time at "Honey's" riding the four wheeler, playing with dogs and pinball machines. What else can a boy ask for right? Thanks Robyn and Paul!

Post Title

Saturn Nectarines, Red Currants and Raspberries


Post URL

http://mercymadame.blogspot.com/2008/08/saturn-nectarines-red-currants-and.html


Visit Merci Madame for Daily Updated Wedding Dresses Collection

Arroz con Leche Creme Brulee and a Cause Close to my Heart


    Everything about this post is very dear to my heart, starting with the arroz con leche and followed by the cause at hand. A few days ago, I visited one of my favorite blogs Make Life Sweeter. When I saw that Linda announced "Got Milk?", a blogging event in support of World Breastfeeding Week, I knew I had to participate. I have been a bit absent from blogging events lately, but I really wanted to bake for this one.

    I try to not to be too militant in my life. I want to keep my eyes and mind open to opinions and points of view, but breastfeeding and the lack of it in many countries (including my own) is an important subject to me. I believe in the bond that breastfeeding creates, in its health benefits and the de-sexualization of breastfeeding. This is not about confrontation or about criticizing those who do not breastfeed, but about raising awareness in our community of the important benefits of breastfeeding. I have found that here in the United States, many more mothers than I expected breastfeed, however, breastfeeding in public is not always accepted. I think it's important to teach our communities how isolating it can be when a mother cannot breastfeed in public and it makes her feel like she is doing something wrong.


    The premise of this event is to cook something with milk as the main ingredient. Of course, I immediately thought about arroz con leche and giving it a new twist by turning it into a creme brulee. I absolutely love the slightly caramelized milk when it's reduced with the cinnamon and vanilla bean and then finished with crispy burnt sugar.

    Arroz con Leche Milk Base

    2 liters organic whole milk
    100 grams sugar
    100 grams Valencia rice or arborio rice
    1 cinnamon stick
    1 vanilla bean, split
    pinch of salt


    In a large saucepan, heat the whole milk, the salt, cinnamon stick and vanilla bean. Heat the milk over medium heat stirring occasionally until it comes to a light boil. Add the sugar and the rice and reduce heat to medium low.

    Cook stirring often for about an hour until the milk has reduced by almost half. We don't want the milk to boil, just lightly simmer (some small bubbles are ok).

    Strain the milk through a fine sieve reserving the milk and discarding the rice, cinnamon stick and vanilla bean. Save for another use, if desired.

    Arroz con Leche Creme Brulee

    1 liter of the rice cooking milk
    10 organic egg yolks
    50 grams sugar


    In a bowl, whisk together the egg yolks and the sugar. Temper in the hot milk and whick until combined. Strain this custard through a fine sieve. Pour into ramekins. Place the ramekins on a sheetpan and bring it to the oven. Once it is in the oven, pour some boiling water in the sheetpan to create a water bath. Bake the custard in a 300F oven until the center sets. The time will depend on the size of your ramekins but for a 4 oz ramekin, it will take approximately 30 minutes.


Post Title

Arroz con Leche Creme Brulee and a Cause Close to my Heart


Post URL

http://mercymadame.blogspot.com/2008/08/arroz-con-leche-creme-brulee-and-cause.html


Visit Merci Madame for Daily Updated Wedding Dresses Collection

Popular Posts

My Blog List