Rhubarb and Strawberry Tart

    Rhubarb, Strawberries, Mascarpone, Orange

    Today is one of those cold, sunny winter Florida days. When I say winter, I mean 65 degrees. It feels like spring as I knew it growing up, crips mornings, dew on the flowers in the garden... If you read one of my previous posts, you might already know that these are my favorite kind of days. Spring is almost here, Easter around the corner.

    The cyclamen is still alive

    A few days ago, I read that Julia at Slice of Cherry Pie was hosting the "In the Bag" event. The secret ingredients were rhubarb, orange and sugar. Immediately I started thinking about this tart but then I realized, "wait a minute... will I be able to find any rhubarb anywhere?". I called around but nobody was carrying rhubarb just yet, so I just decided it might be too early for rhubarb on this side of the Atlantic (Julia is in the UK). But yesterday, I went to the store for something else and there it was, bright red rhubarb waiting for me! I ran home and quickly started making my sable breton for the tart, poaching the rhubarb, the mascarpone orange cream... I was in heaven.


    Rhubarb and Strawberry Tart

    Sable Breton
    Makes 20 4-inch circles

    160 grams sugar
    160 grams salted organic butter
    4 organic egg yolks
    zest of half an orange
    225 grams unbleached all purpose flour
    15 grams aluminum free baking powder

    In an electric mixer, cream the butter and the sugar together. Add the egg yolks and the orange zest. Add the flour and baking powder combined until it comes together. Cover the dough with plastic wrap and let it rest in the refrigerator for at least 2 hours.

    Roll out to about 1/2" thickness and cut 4" circles with a round cutter. Bake the circles in a silicon muffin tray or regular muffin pan that has about 4" circle cavities (you can cut different size circles depending the size of pan you have).

    Bake the circles in a 350 degree oven for about 20 minutes or until golden. Let them cool.

    Mascarpone Orange Cream

    100 grams organic heavy cream
    50 grams mascarpone cheese
    2 tsp orange zest
    20 grams sugar

    Whip all ingredients together until stiff peaks form.

    Poached Rhubarb

    150 grams sugar
    150 grams water
    200 grams rhubarb stalks

    Make a sugar syrup with the water and the sugar by boiling them together. When it comes to a boil, reduce heat and add some of the rhubarb to it. Cook in low heat until poached. Repeat with the rest of the rhubarb. If you are going to refrigerate this, keep it in the syrup until ready to use.

    Assemble the Tart

    Pipe a small amount of mascarpone cream on the center of the sable breton. Place half strawberries around. Place some poached rhubarb on top of the cream and sprinkle chopped pistachios on top. Glaze the the strawberries with warm apricot jelly.


    There will be more strawberries and rhubarb soon... I smell Spring in the air... Thank you for stopping by!

Post Title

Rhubarb and Strawberry Tart


Post URL

http://mercymadame.blogspot.com/2008/02/rhubarb-and-strawberry-tart.html


Visit Merci Madame for Daily Updated Wedding Dresses Collection

Clafoutis


    Custards are comfort food for me. Some people prefer cupcakes, cookies, brownies... Don't get me wrong, I love them too, but there's something about eggs, milk and sugar that I cannot get enough off. Creamy texture, hot or cold.


    I have been thinking about clafoutis. My supermarket has been carrying cherries for a few weeks now. They come from Chile. I'm always very outspoken and critical about buying fruits that come from so far away. They are picked too early, too expensive for what we get, waste too much gasoline, we need to support our local farmers, and so on. I want to be like Jamie Oliver in his new show. I want to wear wellies and pick my own cherries from my own garden, wash them in my outdoor sink and bake a cake with them in my outdoor wood-burning oven. I dream of that... Maybe one day.


    Today, I woke up with cherries on my mind again so I drove to the supermarket to buy Chilean cherries in the middle of February. But guess what? All the cherries were gone! I even called Whole Foods and Costco. That’s how crazy I was! I stopped and started laughing at myself. The seasonal fruit gods wanted to teach me a lesson… Don’t try to buy cherries in the middle of February!


    So I settled for some organic blackberries instead…


    Blackberry Clafoutis


    4 organic eggs

    1 cup (200 grams) sugar

    1 tsp vanilla extract

    1 Tbs kirsch

    1 ½ cups (375 grams) organic whole milk

    1 cup (135 grams) unbleached all purpose flour

    1 lb (454 grams) organic blackberries


    In a bowl, whisk together the eggs, sugar, vanilla extract, kirsch and milk. In another bowl, place the flour. Add the liquids to the flour while whisking making sure that there are no lumps left. Place blackberries in 6 individual ramekins or in one large one. Pour custard over the blackberries. Bake at 350 until top golden brown. Dust with sifted powdered sugar and serve lukewarm.


    Even though I didn't have cherries, this clafoutis was still heaven!


Post Title

Clafoutis


Post URL

http://mercymadame.blogspot.com/2008/02/clafoutis.html


Visit Merci Madame for Daily Updated Wedding Dresses Collection

Tagged

    My family's pastry shop in Amorebieta

    Well, well, well... Let me start by saying that I'm a very shy person and I never intended to reveal personal information in this blog. I just want it to be a culinary outlet. However, I'm going to make an exception because this weekend I was tagged by 2 bloggers.

    I was confused at first because I am new to the blogging world and I didn't know what that meant. "Tagged for a meme? What is that?". Michelle at Culinography was the first to tag me so she explained it to me. I have to reveal 5 facts about myself and tag other 5 bloggers along the way. But after that, I was tagged again, this time by Susan from Sticky, Gooey, Creamy, Chewy so I decided to go ahead and do it.

    The hydrangeas my mom has been keeping alive since she has been visiting

    I hope I do a good job and not be too boring! Here are 10 facts about me since I got tagged twice.

    1) I was born in Clinica Virgen Blanca in Bilbao in the Basque Country, near the Spanish-French border. I lived in nearby Amorebieta all my life until I moved to the US when I was 24. All my family still lives there and I miss them terribly.

    2) I have an outdoor-loving, American husband and a curly, blonde-haired son who keep me grounded. I also have a cat, my parents, 2 brothers, 2 wonderful sisters in law, 2 nephews, 1 niece, lots of uncles and aunts, and about 30 cousins... Big, big family!

    3) When I was in my teens, my parents started sending me abroad in the summers to learn English. I started coming to the US when I was 13. In 1990, I met my adoptive family in Colorado where they took me in for a year while I attended high school. The rest is history. They have become my family in the US and I met my husband thanks to them.

    4) In a previous life, I studied business and economics and even earned an MBA but I was not very good at it since it didn’t really interest me. I don’t know what I was thinking!

    5) Many people are surprised by how eclectic my musical taste really is. From The Stooges to Jonathan Richman, to Elurretan, to The Carpenters, to Jesus Christ Superstar, to Johnny Cash, to Yo La Tengo, Pavement, Sebadoh and an endless list. My dad bought me my first vinyl record when I was 9. It was ABBA.

    6) My mom used to cut my hair until I was 15 years old and let me tell you, I have been traumatized ever since! My teenage years were pretty tough… Oh yes, and I had lazy eye so I had to wear a patch for about a year!

    7) I like breathing the cold air in sunny winter mornings. I love scarves and sunglasses but… I live in South Florida.

    8) I love gardens and hydrangeas are my favorite flowers. However, I have never been able to keep a plant or flower alive.

    9) I am a make up junkie although I hardly ever wear any. When I meet someone I always retouch their make up in my head. I love color palettes although I don't know how to draw or paint. My dad is a painter but I didn't inherit that trait from him.

    10) And last… Just like Bridget over at Bake at 350, I have a secret crush on Bill Murray!

    Was that exciting enough?

    Now, I’d like to tag the following bloggers. I have discovered their blogs recently and have become everyday reads. Some have been around for a while and have many readers so I'm sure they have been tagged before but I'm tagging them again because it's all new to me!

    Bridget at Bake at 350
    Ashley at Artisan Sweets
    Lisa at Pittsburgh Needs Eated
    Ann at Redacted Recipes
    Monica the Pastry Princess
    Lara at Cook and Eat
    Mandy at Fresh from the Oven
    Andreea at Glorious Food and Wine
    Jennifer at Bake or Break
    Helen at Tartelette

    Thank you!


Post Title

Tagged


Post URL

http://mercymadame.blogspot.com/2008/02/tagged.html


Visit Merci Madame for Daily Updated Wedding Dresses Collection

Roasted Pineapple and Passion Fruit Charlotte


    When I read that CookThink had the Root Source Challenge # 2 going on and that the ingredient in question was pineapple, I almost turned it down. For some reason I am not comfortable around tropical fruit. Of course I have eaten plenty of it and cooked with it (I live in Florida) but I’m intimidated by it.

    I didn’t grow up with tropical fruits. I think I was 12 or 13 the first time I ate a kiwi. The only pineapple we ever ate was canned and submerged in a thick sugar syrup. I didn’t even have passion fruit until I came to the US and started working in pastry. I have never had a culinary reference point when it comes to tropical fruit so I almost turned my back on this challenge. But as you might have guessed... I didn’t and here I am!

    I didn’t have to think long and hard about what to make. Charlotte was the first thing that came to my mind and roasted pineapple second. I simply love any roasted fruit and particularly pineapple. So sweet and keeps such a wonderful texture. There is some vanilla, some orange and some star anise in the caramel where the pineapple is roasted and I think it really enhances its flavor.

    This charlotte also has a passion fruit mousse in the middle. I wanted to stick with the tropical theme and since the pineapple is so sweet I thought that tart passion fruit would be perfect for it. Besides I had some passion fruit puree in the freezer. But please, don’t get discouraged if you can’t find any passion fruit in your supermarket… any fruit will work, mangoes, peaches, coconut… Anything you like.


    I had leftover passion fruit mousse so I used it to fill flower shaped silicon molds I had. I think these are adorable and perfect for a buffet, don't you?


    Ladyfingers

    Makes 4 dozen small ladyfingers and 12 small sponge disks

    3 organic egg yolks
    75 grams sugar
    3 organic egg whites
    50 grams powdered sugar, sifted
    75 grams unbleached all purpose flour

    In the bowl of an electric mixer, whip the egg yolks and the granulated sugar until they become very thick and pale (ribbon stage). I only have one bowl for my Kitchen Aid so I have to transfer this mixture to another bowl. Wash the Kitchen Aid bowl.

    Whip the egg whites fully and slowly add the sifted powdered sugar. Keep whipping until you have a pretty stiff meringue. Fold the yolks into the meringue and finally fold the flour in.

    Pipe the ladyfingers and the disks onto a sheet pan lined with parchment paper. I usually draw lines on the parchment so I can guide myself and pipe equal size ladyfingers. Sift powdered sugar on top and bake at 375 degrees for about 10 minutes. Let them cool.

    Roasted Pineapple

    225 grams medium diced pineapple
    100 grams demerara or turbinado sugar
    15 grams butter
    Juice of 2 oranges
    1 Tbs dark rum
    ½ vanilla bean
    1 star anise

    Make dry caramel with the sugar. Add the butter, orange juice, vanilla, star anise and rum. If the caramel seizes a little, let it dissolve in the pan. Add the diced pineapple, stir and simmer for about 10 minutes on top of the stove or finish in a 350 degree oven. Let it cool. Strain the caramel before we assemble the charlotte.

    Passion Fruit Mousse

    100 grams passion fruit puree
    10 grams sugar
    1 sheet gelatin
    100 grams heavy cream

    Whip cream to soft peaks and keep in refrigerator. Soften the gelatin in ice water for about 5 minutes. In the meantime, warm the passion fruit puree and the sugar until the sugar dissolves. Add the softened gelatin leaf to the warm puree. Stir making sure that the gelatin has dissolved completely. Set this base over an ice bath until it cools to the touch. Fold in the whipped cream and stir until the mousse is well combined.

    Assemble the Charlotte

    I used stainless steel ring molds that are 2 inches high by 3 inches wide but you can use any mold you like, even a large one. You can even make it in a cake pan that has a removable bottom or a cheesecake pan. Anything will work.

    Line the outside of the mold with the ladyfingers. Place a sponge disk on the bottom. Spread some diced pineapple on top and a little bit of the passion fruit mousse. Place another disk on top, some more pineapple and finish with the mousse.

    Refrigerate for at least 4 hours so the mousse sets. Serve it topped with some more roasted pineapple.


    And finally... I had to share this photo with you. This is the reason why I do what I do, the one who always wants to devour everything I make. Too cute!

Post Title

Roasted Pineapple and Passion Fruit Charlotte


Post URL

http://mercymadame.blogspot.com/2008/02/roasted-pineapple-and-passion-fruit.html


Visit Merci Madame for Daily Updated Wedding Dresses Collection

Pumpkin and Bananas


    I was hesitant to post this recipe now although I made it this morning for breakfast. I know it is still winter everywhere else in the country but here in Florida is warm and I have been dreaming about strawberries and nectarines. In my head pumpkin feels too seasonal. My mom is here visiting and she loves my banana bread recipe (she and everyone else in my family!) so she asked me to make it for her. How could I say no, right?

    My curly, blonde haired boy also loves this bread. I make big batches of it and bake it in small loaf pans, then save one for that day and freeze the rest. It's a healthy snack. I cut it up in small cubes and put it in a zip lock bag for him to munch on in the car or in the stroller. He says "ama, coco, ama, coco". Anything sweet is coco for him.


    Pumpkin and Banana Bread with Toasted Pumpkin Seeds

    144 grams ripe organic bananas
    144 grams organic canned pumpkin puree
    125 grams sugar
    125 grams demerara sugar
    3 organic eggs
    200 grams canola oil
    200 grams organic whole wheat flour
    4 grams sea salt
    4 grams baking soda
    30 grams organic roasted pumpkin seeds

    Extra raw pumpkin seeds for the topping
    Demerara sugar for the topping

    Roast pumpkin seeds in a 350 degree oven for 5 minutes. Set aside.

    In a large bowl, combine whole wheat flour, salt and baking soda.

    In a separate bowl, whisk together the pumpkin puree, bananas, sugar, eggs and oil. Add this mixture to the dry ingredients and mix until combined. Fold in the roasted pumpkin seeds.

    Pour batter into the greased molds and top with raw pumpkin seeds and a little bit of demerara sugar. Bake at 350 degrees.


    Since my parents have been here I feel like we haven't gone to visit our cutie pie neighbor Stella as often, so today we wrapped up one of the pumpkin banana breads and brought it over to her. I think she really liked it and she is a hard one to please!

    I have been getting a lot of questions regarding the food packaging I use for my baked goods so I thought I would share that with you. And what is my secret source? None other than Martha Stewart! She has a beautiful line of cookie boxes, ribbon, paper and other crafting products that I go nuts over. You can get them at Michaels or online at Martha Stewart Crafts.

Post Title

Pumpkin and Bananas


Post URL

http://mercymadame.blogspot.com/2008/02/pumpkin-and-bananas.html


Visit Merci Madame for Daily Updated Wedding Dresses Collection

Peanut Butter and Jelly Souffle


    I have been meaning to make souffle for a while. A few days ago my mom and I started talking about our favorite desserts from our childhoods. She mentioned a souffle she used to eat at Restaurante El Cojo, the fine dining restaurant we have in our little town and that has been around for over 70 years. This was the place we used to always go to for any birthday, wedding, anniversary... Hours and hours were spent around the table. We used to sit down to eat at 2pm and wouldn't leave the place until 6 or 7pm. My grandmother Miren and my uncle Jose would sing and sign and play cards... Those are some of the fondest memories I have, around food and surrounded by my family.

    My mom was describing this special souffle they used to make there which is a little bit different than what I am making here. I love listening to her talk about her memories. I wish I could sit in front of a big screen in a dark movie theater and watch her life as she grew up with 7 brothers and sisters in my grandparents' patisserie. My mom was the oldest of the 8 children and she remembers so many stories about everybody... It's a pleasure to listen to her speak.

    This version of souffle that she remembers so fondly had a thin layer of cake on the bottom with some fruit on top and a meringue souffle on top. She also remembers how they used to serve all the creams, fruit compotes and liquers tableside.

    So after talking about this souffle and some of our other favorites, we decided it was time to get hands on and "bake it already!". My mom is not a big fan of peanut butter but I saw it in my pantry yesterday and thought I had to use it for something soon. Today was a cloudy day and for some reason peanut butter and jelly sounded good. Just like grilled cheese sounded good. So she gave in and we made it and she really enjoyed it!


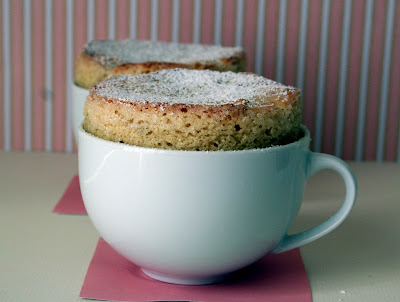
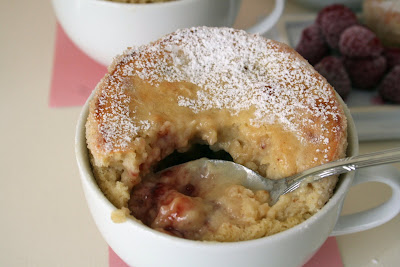
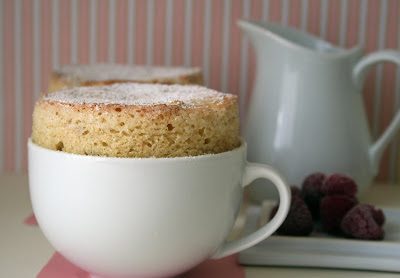
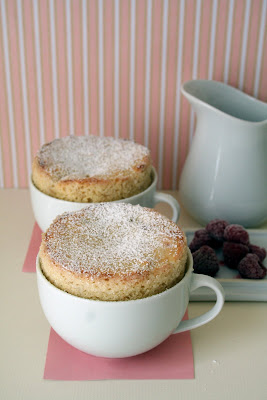
    My souffle is a bit different since it's a roux base souffle. I have tried different recipes throughout the years, some of them pastry cream based, some are meringues, but none of them have the texture and density of this one. It's light and cakey and creamy at the same time. Just perfect! I'm really not a big fan of meringue souffles. I feel like I'm being cheated when I get a chocolate souffle that disappears in my mouth. And one final thing about this souffle I love so much is that I like to underbake it by a tiny, tiny bit... maybe 2 minute or so. This makes the center so creamy...

    So here it is:

    Peanut Butter and Jelly Souffle

    Makes 6-8 large ramekins

    4 oz (114 grams or 1 stick of butter) organic unsalted butter
    4.75 oz (135 grams) unbleached bread flour
    1 pint (500 ml) organic whole milk
    5 organic egg yolks
    5 organic egg whites
    4 oz (114 grams) sugar
    5 oz (142 grams) organic creamy peanut butter
    2 Tbs raspberry liquor

    Raspberry Jam
    Creme anglaise or vanilla ice cream
    Fresh raspberries

    Preheat oven to 400 degrees. With a pastry brush, butter the inside of your ramekins. Pour some granulated sugar in the ramekin and spread it all over while moving the ramekin around. Pour out any excess sugar.

    In a small saucepan bring the milk to a boil. Set it aside and keep it warm.

    In a medium saucepan, add the butter and the flour and make a roux. Cook for a couple of minutes to make a paste. Add the hot milk and whisk the mixture together until it boils and turns into a homogeneous paste. Transfer this paste into a large bowl and stir with a wooden spoon until it cools down a little bit, about one minute. Add the egg yolks one at a time and mix them into the paste. Add the peanut butter and stir until well incorporated and most of the lumps have disappeared. Finally add the raspberry liquer to the base.

    Make a meringue with the egg whites and the sugar. Fold a third of the meringue into the base and stir. You can be as vigorous as you want now. Fold in the rest of the meringue but be careful not to deflate it too much at this point.

    Spoon the souflle mix ito the ramekins and spoon a teaspoon of raspberry jam in the middle. Cover it with some more mix. We want to fill the ramekins almost to the top, about 3/4 of the way.

    Bake at 400 degrees for about 20 minutes. Dust with powdered sugar and serve right away.


    I just ordered some gianduja paste from L'Epicerie a few days ago so I can't wait to make gianduja souffle. Maybe accompanied by some frangelico anglaise.... Hmm....

Post Title

Peanut Butter and Jelly Souffle


Post URL

http://mercymadame.blogspot.com/2008/02/peanut-butter-and-jelly-souffle.html


Visit Merci Madame for Daily Updated Wedding Dresses Collection

Gluten, Dairy and Soy Free Chocolate Chip Cookies

    This one is for someone very special…


    I know this recipe might come as a surprise to those who know me. "Gluten Free???… But you love bread and cookies and anything with flour!". Yes, I do, but for reasons that are too boring and complicated to explain in this venue, I have been on a semi-gluten-free diet for a few months. I have not been very strict about it because I do taste all the pastries I make, but I am trying.

    The first time I really paid attention to gluten allergies was when my godson Connor was put on a gluten, dairy and soy free diet as part of his treatment for autism. Diet has been a crucial element in his recovery as well as other biomedical treatments. He is a beautiful, funny, affectionate and extremely intelligent 8-year-old boy who loves sports and is the best dance partner ever! Too bad he lives a 3-hour flight away from me or he would be eating these everyday.


    The first time I made these cookies, I gave them to C. to try without telling him they were gluten, dairy or soy free. Too many “frees” for him to even want to try them. So I just didn’t say anything. I had just pulled them out of the oven. He ate one, then another and said “These are the best chocolate chip cookies you have ever made!”. And he meant it. They were warm and soft and chewy. They truly are very, very good.

    I think that the trick to a nicely shaped cookie is to roll the dough into logs and then slice the individual cookies. I like this method better than the scooping one because I think it’s faster, the cookies look nicer after they are baked and also because a log is easier to store in my freezer than a sheet of scooped cookies. These are some tricks you learn in a kitchen that bakes 50 million cookies a day!


    Gluten, Dairy and Soy Free Chocolate Chip Cookies

    110 grams (4 oz) butter flavored non-hydrogenated shortening
    110 grams (4 oz) organic brown sugar
    55 grams (2 oz) organic milled sugar
    1 organic egg
    1 tsp vanilla extract
    225 grams (8 oz) Bob’s Red Mill Gluten Free baking mix
    1/2 tsp xanthan gum
    155 grams (5.5 oz) gluten, dairy and soy free chocolate chip
    3g (1/2 tsp) baking soda
    5g (1 tsp) fine sea salt

    In the bowl of an electric mixer, cream the shortening and the sugars until well combined. Add the vanilla extract and the egg. Scrape the bottom and sides of the bowl with a spatula to ensure that all ingredients are well incorporated. Add the baking mix, the xanthan gum, the baking soda and the salt. Fold in the chocolate chips.

    Dump the dough onto a lightly floured surface and roll into a log that is about 3 inches in diameter. Wrap the log in parchment paper and refrigerate it for at least one hour.

    Cut the log into half an inch disks and bake them in a 350ºF oven for about 12 minutes or until the edges are golden brown but the center is slightly soft.


    This cutie pie is Sophia, Connor’s little sister who ate two of this cookies in a row!

    To learn more about diet as part of autism healing, please visit ANDI (Autism Network for Dietary Intervention).
    On Egin!

Post Title

Gluten, Dairy and Soy Free Chocolate Chip Cookies


Post URL

http://mercymadame.blogspot.com/2008/02/gluten-dairy-and-soy-free-chocolate.html


Visit Merci Madame for Daily Updated Wedding Dresses Collection

Lemons and Thyme


    I had to clean out my refrigerator today. I had too many leftovers, separated eggs, bits and pieces... And I thought, "I have to make something with all these ingredients".

    I made meringue for my buttercream on Friday so I had tons of egg yolks left. I also had heavy cream from the chocolate mousse, some thyme from my last chicken dish and some candied lemon zest I made a while ago. This was perfect for crème brûlee. Whenever I have extra yolks I always think of ice cream but since I made some not very long ago, I decided to go for baked custard.

    My former executive pastry chef, Sebastien had me make a delicious lemon and thyme pastry cream for a Christmas buffet a few years ago, so I immediately thought of that and how fantastic it was. We filled mini éclairs with it and they were a hit. This recipe can most certainly be made using fresh grated lemon zest but I just happened to have candied zest and that’s why I am using it.


    Candied Lemon

    200 grams water
    200 grams sugar
    2 lemons, zest peeled and julienned

    Make a syrup by boiling the water and sugar together.
    In the meantime, peel the lemons and cut the zest in thin strips. Blanch the zest in boiling water for a minute. Discard the water and repeat this process two more times. This allows us to get rid of the bitterness in the zest while we cook it.
    Simmer the blanched lemon zest in the syrup for about 15 minutes or until tender. Store the zest in the syrup in the refrigerator until ready to use.

    Candied Lemon and Thyme Crème Brûlee

    1 liter of heavy cream
    10 egg yolks
    200 grams sugar
    Candied lemon zest cut into very small pieces
    6 sprigs of fresh thyme

    In a saucepan, boil the cream with the thyme leaves. Let it steep for 10 minutes. Strain the cream and discard the thyme leaves.
    In a separate bowl, whisk together the egg yolks and the sugar. Temper the hot cream over the yolks and whisk until well mixed. Strain the custard through a fine chinois to get rid of any coagulated egg yolk. Add the candied lemon zest. The candied zest has a tendency to fall to the bottom of the custard after it has been mixed in, so make sure to stir the mix before pouring it into the ramekins.
    Place the ramekins we are using on a roasting pan or a sheet pan. Pour the custard into the ramekins and bring them close to the oven. Pour hot water in the roasting pan or sheet pan and place in the oven.
    Bake in the water bath at 300ºF until the center of the custard doesn’t giggle when we shake the pan. We are not looking for any color on top of the custard.
    Let the ramekins cool a little bit, cover them with plastic wrap and refrigerate for a few hours.
    When we are ready to serve, sprinkle evenly some raw sugar on top of the custard and burn the sugar with a blowtorch.


    I think my favorite part about eating crème brûlee is the moment when I get to tap the burnt sugar top and break it open. It's just magic, isn't it?

Post Title

Lemons and Thyme


Post URL

http://mercymadame.blogspot.com/2008/02/lemons-and-thyme.html


Visit Merci Madame for Daily Updated Wedding Dresses Collection

Early Valentine’s and Mini Pie Revolution #2


    I know I’m going to get a lot of heat for this but the truth is that I have never been a big fan of Valentine’s Day. Don’t ask me why but the bows, heart shaped boxes, teddy bears… it’s just not me. All I want is a nice evening with chocolate and raspberries. C. will not be home for Valentine’s this year so we celebrated early.

    At the same time I found out that he was going to be away, I found the “Mini Pie Revolution #2” and I thought this was a perfect opportunity to make something for Valentine’s and to enter the blogging event which ends on February 12th.

    I love raspberries and C. loves chocolate so it had to be chocolate mousse and raspberry tart. I have to admit that for a while, I felt like the combination of chocolate and raspberries was overdone. It was everywhere. I know, it sounds a little snobbish of me, right? As if somehow this combination was “so yesterday”. I apologize, I shouldn’t even admit to this. I have now come to my senses and realize that we should never question classic flavor combinations.

    Besides, I couldn’t let these raspberries get away. Did you see the size and color of these berries? And they were just as sweet as you might envision them to be. My mom couldn’t believe it. “Is it raspberry season?”, she asked… Hmmmm.. “No”, I replied embarrassed. You see, we come from a family where you only eat what’s in season so my mom couldn’t understand how I was able to find them in the first place or what’s worse, why I would spend so much money to buy something that in her mind is probably not as sweet, comes from who knows where, etc, etc. But these were excellent so she forgave me.


    The tart shell is made from chocolate sugar dough that I pre-baked and then filled with a layer of very thin raspberry pate de fruit (the batch that didn’t come out right the first time), chocolate mousse and topped with the beautiful raspberries. Oh yes, and the little dots, that is strained, store-bought peach jam. So here it is.

    CHOCOLATE MOUSSE AND RASPBERRY TART

    Chocolate Sugar Dough
    This recipe makes a lot of dough but just use whatever you need for your tarts and freeze the rest.

    450 grams butter
    225 grams powdered sugar
    2 organic eggs
    5 grams sea salt
    4 grams baking powder
    625 grams flour
    25 grams cocoa powder

    Cream together the butter and the powdered sugar with the paddle attachment. Add the eggs one at a time.
    In a separate bowl, sift together the flour, cocoa powder, salt and baking powder. Add the dry ingredients to the butter mixture and mix until combined.
    Wrap dough with plastic wrap and chill for at least 2 hours.
    Remove from refrigerator and roll out to about 1/8” to 1/4” thick. Place rolled dough in the mini ring molds and refrigerate for another 30 minutes so the dough relaxes and does not shrink in the oven.
    Bake in a 325ºF oven for about 14 minutes or until fully cooked. In the middle of the baking process, I use a fork to deflate the bottom of the dough if it starts to puff up or you could lightly dock it before placing it in the oven. I don’t use pie weighs or beans because I have found that if you let the dough rest before baking it and that if you lightly dock it, it will keep its shape.

    Chocolate Mousse
    Makes 8 small tartlets

    100 grams 70% chocolate
    300 grams heavy cream, whipped to soft peak

    In a small bowl, melt the chocolate over a double boiler. In the meantime, whip the cream to soft peak.
    When the chocolate is hot to the touch, remove it from the double boiler and pour about a third of the cream into it. Whisk the cream into the chocolate with a wire whip. This must be done quickly so the chocolate doesn’t seize up. Add the rest of the cream but this time, fold it in with a spatula. Be careful not to over-whip or the mousse will break.

    Assemble the Tart

    Pipe a thin layer of soft raspberry pate de fruit or raspberry jam on the bottom of the tart shell. Pipe the chocolate mousse on top. Top with fresh raspberries and decorate each berry with a dot of the strained peach jam or apricot glaze would be even better.


    Taking these photos was a real challenge today because my curly, blonde-haired boy could not stay away from the tarts. He was screaming for them. Too cute!

    Happy Valentine’s Day!

Post Title

Early Valentine’s and Mini Pie Revolution #2


Post URL

http://mercymadame.blogspot.com/2008/02/early-valentines-and-mini-pie.html


Visit Merci Madame for Daily Updated Wedding Dresses Collection

... And We Had a Party!

    If you read my previous post, you know we were throwing a baby shower for my dear friend Deena this weekend. Well, it happened and it was fantastic. Too much food, too many desserts but plenty of fun and laughs. Just as always.

    I want to share some photos of the cake and the pastries I prepared. Some of them you have seen here before because I have to confess, when I make a recipe, I tend to make enough that I can freeze and use for future events. Never compromising flavor or texture, of course!

    I took these photos before we set up the dessert buffet because I knew the lighting wasn't going to be very good where the main table was. I was driving everybody crazy with my "please move this... could you please move over a bit..." and so on, but they were patient with me.

    For all of you perfectionists out there, I know that the cake is not iced to perfection. It was hot in my kitchen, the buttercream was melting on me and I had a curly, blonde-haired boy tugging at my leg. So it was not as I would have liked to finish it but nobody seemed to notice, or even better, nobody dared to mention it!


    Chocolate Buttermilk Cake with Chocolate Mousse and Fresh Raspberries

    Vanilla and Chocolate Sugar Cookies Favors

    Lemon Bars with Vanilla Cream and Blueberries

    Mini Chocolate Cupcakes with Cream Cheese Icing

    Pecan Sandies

    Lavender and Orange Macaroons

    These were a hit!

    It's a blessing to have great friends like these!

Post Title

... And We Had a Party!


Post URL

http://mercymadame.blogspot.com/2008/02/and-we-had-party.html


Visit Merci Madame for Daily Updated Wedding Dresses Collection

We Are Having a Party!

    My dear friend Deena is having a baby and we are throwing a baby shower for her this Saturday. All her close friends and family have gathered to put together the perfect, fun party for her. She deserves it... and she looks so beautiful pregnant!

    There will be abundant food (too much as always) and of course, I have been given the task of preparing the cake, which I have taken on with pleasure. I have also been busy at work preparing many different mini desserts for a Viennese table. Light and fresh; that’s the idea. Mainly because we have had 80 degree weather in South Florida.

    Here is a look into the prep work and I promise I will post some photos of the finished pastries soon. We don't want Deena to see any of before the party!


    Congratulations Deena!

Post Title

We Are Having a Party!


Post URL

http://mercymadame.blogspot.com/2008/02/we-are-having-party.html


Visit Merci Madame for Daily Updated Wedding Dresses Collection

Time to Make the Doughnuts


    Who doesn’t love sweet fried dough?

    As soon as I saw that Tartelette announced the “Time to Make the Doughnuts” event, my brain started spinning; yeast doughnuts, filled doughnuts… And then I thought to myself… “Wait a minute, I have never made doughnuts before!”. How could that be? I love doughnuts!

    I have plenty of doughnut recipes and I love discovering new ones, but I have never made them. When I was in culinary school, I must have skipped that lesson. Oh, oh… So this was the perfect opportunity to take on the challenge.

    These doughnuts have no yeast in them. They are actually made from fried choux paste. Instead of the traditional pastry cream, I decided to fill them with chiboust, which is pastry cream lightened with meringue. I thought the chiboust complements the light beignets much better than the thick pastry cream. As for the flavor… there I go with the caramel again! Bananas that are slowly cooked in a light caramel and then folded into the cream. Winter brings out all my caramel cravings!


    Caramelized Banana Beignets with Chocolate Soup

    Beignets

    Makes about 4 dozen small beignets

    250 ml water
    Pinch of salt
    150 grams flour
    110 grams of unsalted butter
    3-4 eggs
    Canola oil to fry
    Cinnamon sugar to dust

    In a saucepan, place water, salt and butter and bring to a boil.
    Add the flour all at once and stir with a wooden spoon. We want to cook the dough for a couple of minutes to cook out the starch flavor.
    Transfer dough to a bowl and stir until it cools down a bit. Add the eggs, one at a time incorporating them into the dough.
    Spoon small mounts of dough into the 350ºF canola oil and fry until golden brown.
    Roll in cinnamon sugar and fill with the caramelized banana chiboust.

    Caramelized Bananas

    2 bananas
    100 grams sugar
    25 grams butter
    50 grams heavy cream

    Cut bananas in half and split each half down the middle, so you have eight banana quarters.
    Make a dry caramel with the sugar and add the bananas to this caramel.
    Add the cream and the butter and let the bananas simmer in the sauce for a few minutes until they are soft. Set aside.

    Vanilla Chiboust

    320g whole milk
    ½ vanilla bean, split
    4 egg yolks
    25 grams sugar
    25 grams cornstarch
    4 egg whites
    35 grams sugar

    In a medium saucepan, boil the milk and the vanilla bean.
    In a bowl, whisk together the egg yolks, sugar and cornstarch.
    Temper the hot milk into the yolk mixture. Pour this custard back in the saucepan and cook until it thickens. Remove from pan and place in a clean bowl.
    Add the cooked bananas into the warm pastry cream. I didn’t add most of the caramel, just the bananas . We want to keep some small pieces of banana.
    While the pastry cream is still warm, we are going to make an Italian meringue with the egg whites and the sugar.
    Place the egg whites in the bowl of an electric mixer. Turn the mixer on slow speed so the egg whites have a chance to develop some volume while we cook the sugar. We want the egg whites to be almost fully whipped when we add the hot syrup.
    Place the sugar with a couple of tablespoons of water in a saucepan and cook until it reaches 240ºF or soft ball stage.
    Pour the hot syrup over the whipped egg whites while the mixer is on low speed. Continue whipping until it has whipped into a meringue.

    Carefully, fold the meringue into the warm pastry cream trying to keep as much volume as possible.

    Place the caramelized banana chiboust into a pastry bag and pipe into the beignets.

    Chocolate Soup

    200 grams milk
    100 grams heavy cream
    100 grams 70% bittersweet chocolate

    In a saucepan, bring cream and milk to a boil. Pour over chopped chocolate and stir until chocolate melts. Serve warm.


    My parents are visiting from the Basque Country and my mother has been my devoted recipe taster. She particularly liked these beignets because she loves the light chiboust.

    Eskerrik asko Ama!

    And also... don't you think this is a pretty sexy Valentine's Day dessert too?

    On Egin!

Post Title

Time to Make the Doughnuts


Post URL

http://mercymadame.blogspot.com/2008/02/time-to-make-doughnuts.html


Visit Merci Madame for Daily Updated Wedding Dresses Collection

Raspberry Pâte de Fruit


    I have to begin by saying this recipe comes from my dear friend and chef Sebastien Thieffine. I made my first pâte de fruits under his guidance and I haven't stopped ever since.

    I could go on and on about Sebastien and the three years I worked for him. He was able to create harmony out of chaos and really developed a great team of pastry chefs. I would describe it as a magical time or as he liked to call it, "the Dream Team". He was a great motivator which made us want to work hard for him and show him “what we were made of”. In return, he taught us everything he knew, shared all his recipes, knowledge and encouraged us to learn outside of our small pastry kitchen. I learned many technical skills but most importantly, I learned how to run an organized and efficient kitchen. I have never wanted to work so hard for anybody else in my life! I owe so much to him...


    I made pâte de fruits for Christmas as part of my holiday gifts and all the recipients were delighted and impressed. The truth is that pâte de fruit is really easy to make. It does require some special tools and ingredients but it is not technically challenging and the result is a sweet, colorful and fun confection. Just like macaroons, pâte de fruit can be made with infinite flavor combinations; I have even seen savory versions.

    That said, I have to admit that the first time I made pâte the fruit at home, my thermometer was not well calibrated and it ended up resembling a thin jam more than the “gummy” candy that is supposed to be. So make sure you have a calibrated thermometer before you start any of this!

    The other special tool that I have is a square stainless steel frame that I use to cast the pâte de fruit in but I don’t think it’s necessary. It can also be poured into a parchment lined half sheet pan and it works just fine. I also find that having a cold surface such as granite or marble really helps because it allows the pâte de fruit to cool down faster.


    RASPBERRY PATE DE FRUIT

    I bought a lot of frozen fruit purees and the rest of the ingredients for my Christmas project from L’Epicerie, which is a specialty store that carries many hard-to-find ingredients. It’s a beautiful online store and I really encourage you to check it out.

    I recommend that you have all your ingredients scaled and your pan prepared before you start cooking the recipe. Like I mentioned, I use a stainless steel square frame that I place on top of a silpat on a marble.

    500 grams of raspberry puree
    200 grams of whole raspberries, fresh or frozen
    15 grams of yellow pectin
    75 grams of granulated sugar
    750 grams of granulated sugar
    150 grams glucose
    12 grams tartaric acid solution*
    12 grams framboise or kirsch


    In a large saucepan, warm raspberry puree and whole raspberries to 40ºC.

    In a bowl, whisk apple pectin and 75 grams of sugar until they are well mixed. This is important to avoid lumps when we add them to the fruit. Add this mixture to raspberries and return to a boil.

    Add 750 grams of sugar and glucose. Cook mixture to 106ºC while whisking. It will bubble up so make sure to use a large pot.

    When it reaches 106ºC, turn off the heat and add the alcohol and the tartaric acid solution. Pour the fruit into your frame and let it sit until it cools down and solidifies.

    Cut it into squares or other shapes and roll in granulated sugar before serving.

    *The tartaric acid solution is a mixture of equal parts of tartaric acid and water.


    There is nothing more beautiful than to give or to receive a nicely packaged box of homemade, colorful pâte de fruit. I know mine will be all gone soon! I hear in the background… “ama, coco… ama, coco”…

Post Title

Raspberry Pâte de Fruit


Post URL

http://mercymadame.blogspot.com/2008/02/raspberry-pate-de-fruit.html


Visit Merci Madame for Daily Updated Wedding Dresses Collection

Popular Posts

My Blog List