"Carvel" Ice Cream Cake and a Birthday


    Wednesday was my dear C.'s birthday and this is all he wanted... a Carvel style ice cream cake. No presents, no birthday party, no crowds, just an ice cream cake. He is a man of simple needs. C. and I are what people refer to as an "unexpected couple". I suppose at first glance, we do not match. He is very private and would kill me if I revealed too much personal information, but I do want to say that he lifted me and carried me through some of the worst times in my life. He has a character that I admire, strong as I would like to be, an independent spirit.

    So back to the cake... In case you are not familiar with Carvel, it is a franchise of ice cream shops mostly located in the East Coast. I never knew about them until I moved to Florida and never saw one in Colorado where we lived before. They are known for the ice cream cakes that are decorated with bright colors (most popular is a whale design) and have layers of ice cream, chocolate cake and "chocolate crunchies". The chocolate crunchies are essential. I have never seen a list of the ingredients they use in their ice creams and cakes, but judging by looks, I presume they have many ingredients in them that I cannot even pronounce (and I hope the Carvel Corporation does not suit me for saying this). Guilty pleasure.

    Since this was C.'s only request, I gladly made him two ice cream cakes. I built them in individual ring molds so there was no need to cut and it was easier to eat. The first cake had a chocolate buttermilk cake base, vanilla bean ice cream and chocolate streusel to emulate the Carvel crunchies. The other cake had the same chocolate buttermilk cake base, double chocolate chip ice cream and chocolate meringues.


    Chocolate Buttermilk Cake

    Makes quarter sheet pan

    1 stick unsalted butter, softened
    1/2 cup sugar
    1/2 cup brown sugar
    2 eggs
    3 oz unsweetened chocolate, melted
    1/2 cup buttermilk
    1/2 tsp vanilla extract
    1 cup flour
    1/2 tsp baking soda

    Cream the butter, sugar, brown sugar and vanilla extract. Add the eggs one at a time. Scrape the bowl so all ingredients are well mixed. Add the flour with the baking soda and while the mixer is mixing these, add the buttermilk. Mix until all ingredients are combined.

    Spread batter on a quarter sheetpan and bake in a 350 degree oven for about 15 minutes. Let the cake cool. Cut 3 inch circles with a cookie cutter. We will build the cake in a ring mold that size.

    Vanilla Ice Cream

    500 grams whole milk
    130 grams heavy cream
    40 grams glucose or corn syrup
    150 grams of sugar
    1 vanilla bean, scraped
    180 grams egg yolks


    In a saucepan, combine the whole milk, cream, vanilla bean, glucose and sugar together. Bring to a boil. Have the egg yolks lightly whipped on a bowl and when the milk comes to a boil, temper it into the egg yolks. Whisk. Add the custard back to the saucepan and cook stirring constantly to 84 degrees Celsius.

    Strain the custard through a fine sieve into a clean bowl and chill it over an ice bath. When it has cooled, cover it with plastic wrap and refrigerate. Let it cool overnight and the next day churn in the ice cream machine. Freeze.

    When ready to build the cake, take the ice cream out of the freezer and place it in the refrigerator to soften a bit and until it is pliable.

    Chocolate Streusel

    50 grams unsalted butter
    50 grams sugar
    50 grams almond flour
    40 grams flour
    10 grams cocoa powder
    pinch of salt


    Cream all ingredients together until a ball forms. Wrap in plastic wrap and freeze until it hardens. When it is solid, grate it with a large grater or even through a food grinder. You will get little pieces of streusel. Refrigerate right away.

    When the pieces of streusel are hard again, spread them on a sheetpan and bake in a 350 degree oven for about 12 minutes. Let the streusel cool and store in an airtight container until ready to use.

    Double Chocolate Chip Ice Cream

    750 grams half and half
    150 grams egg yolks
    150 grams sugar
    225 grams bittersweet chocolate (58%), chopped
    50 grams bittersweet chocolate, finely chopped


    In a saucepan, bring the half and half and the sugar to a boil. Place the egg yolks in a bowl and when the half and half is boiling, temper it into the egg yolks. Bring this mixture back to the saucepan and cook to 84 degrees Celcius. Pour this over the chopped chocolate (225 grams) and whisk until the chocolate melts. Strain the custard through a fine sieve and refrigerate overnight.
    The next day, churn it in the ice cream machine and at the end of the churning, fold in the finely chopped chocolate. Freeze.

    Chocolate Meringues

    150 grams organic egg whites
    150 grams sugar
    150 grams powdered sugar, sifted
    25 grams good quality cocoa powder, sifted


    Whip the egg whites until they are almost fully whipped. Slowly start adding the granulated sugar while the mixer is still running. Whip until we obtain a shiny, stiff meringue but make sure not to overwhip or it will dry out.

    Sprinkle a third of the sifted powdered sugar and cocoa powder and fold with a spatula. Repeat until all the powdered sugar and cocoa powder have been folded in.

    Place meringue into a pastry bag with number 4 pastry tip and pipe lines onto a sheetpan lined with parchment paper. Bake in a 200 degree oven for an hour. Let the meringues cool and then, store them in an airtight container until ready to use.

Post Title

"Carvel" Ice Cream Cake and a Birthday


Post URL

http://mercymadame.blogspot.com/2008/05/ice-cream-cake-and-birthday.html


Visit Merci Madame for Daily Updated Wedding Dresses Collection

New Design and a Thank You


    It was time for Cannelle Et Vanille to get a new look. Like Mrs. French said... "a blog cannot have too many outfits". Well said. I started this blog only a few months ago with little expectations, but it really has turned into something very special in my life.

    All the credit for the beautiful banner and new layout goes to Kaytlyn of Beneficial Design. Thank you for being patient with me and capturing the essence of this blog and my personal style. Thank you very, very much Kaytlyn. And I also want to thank my friends Jill, Amaia and Nadia for putting up with my indecisiveness.

    And finally, thanks to all of you out there who keep coming back and inspiring me everyday. Do you like it?...

Post Title

New Design and a Thank You


Post URL

http://mercymadame.blogspot.com/2008/05/new-design-and-thank-you.html


Visit Merci Madame for Daily Updated Wedding Dresses Collection

Daring Bakers: Apricot, Passion Fruit and White Chocolate Opera


    I cannot believe how fast time flies... it's already time for another Daring Bakers challenge! This month's challenge is hosted by the Daring Bakers founders, administrators and Zen Masters themselves Lisa from La Mia Cucina and Ivonne from Cream Puffs in Venice and co-hosted by Fran of Apples Peaches Pumpkin Pie and Shea of Whiskful.

    This month's challenge is opera cake, not the traditional coffee and dark chocolate cake, but a light-colored opera. Any flavors or ingredients are allowed as long as the resulting cake is light. Spring is in the air! This month's challenge is also trying to draw attention to LiveSTRONG Day which was earlier this month.

    I have been making a lot of opera cakes lately. I blogged about one of them a couple of months ago which was flavored with matcha, lemon and dark chocolate. My interpretation for this challenge includes the fruits that are in season, apricot and passion fruit. I made some changes to the recipe because I thought the egg yolk buttercream was a bit too rich for the overall cake. Instead I made a italian meringue buttercream and added some apricot puree to it. Then I added a small amount of passion fruit puree to the white chocolate mousse. I thought the sweetness of the white chocolate paired really nicely with the sweet but slightly tart apricots and the sour passion fruit. Overall it was a lovely cake and I thought it was very appropriate for the season, clean, refreshing and not overly sweet. We had a large cookout over Memorial Day weekend and I served it then along with other pies I made (more on that soon).


    Joconde

    6 large egg whites, at room temperature
    2 tbsp. (30 grams) granulated sugar
    2 cups (225 grams) ground blanched almonds
    2 cups icing sugar, sifted
    6 large eggs
    ½ cup (70 grams) all-purpose flour
    3 tbsp. (1½ ounces; 45 grams) unsalted butter, melted and cooled

    Preheat the oven to 425◦F. Line three quarter sheetpans with parchment paper and brush with melted butter.

    In the bowl of a stand mixer fitted with the whisk attachment (or using a handheld mixer), beat the egg whites until they form soft peaks. Add the granulated sugar and beat until the peaks are stiff and glossy. If you do not have another mixer bowl, gently scrape the meringue into another bowl and set aside.

    If you only have one bowl, wash it after removing the egg whites or if you have a second bowl, use that one. Attach the paddle attachment to the stand mixer (or using a handheld mixer again) and beat the almonds, icing sugar and eggs on medium speed until light and voluminous, about 3 minutes. Add the flour and beat on low speed until the flour is just combined (be very careful not to overmix here!!!).

    Using a rubber spatula, gently fold the meringue into the almond mixture and then fold in the melted butter. Divide the batter between the pans and spread it evenly to cover the entire surface of each pan.

    Bake the cake layers until they are lightly browned and just springy to the touch. This could take anywhere from 5 to 9 minutes depending on your oven. Put the pans on a heatproof counter and run a sharp knife along the edges of the cake to loosen it from the pan. Cover each with a sheet of parchment or wax paper, turn the pans over, and unmold. Carefully peel away the parchment, then turn the parchment over and use it to cover the cakes. Let the cakes cool to room temperature.

    Syrup

    ½ cup (125 grams) water
    ⅓ cup (65 grams) granulated sugar
    1 to 2 tbsp. Kirsch

    Stir water and sugar together in the saucepan and bring to a boil. Remove the syrup from heat and add the kirsch when it has cooled slightly.

    Apricot Buttercream

    100 grams egg whites
    200 grams sugar
    300 grams unsalted butter at room temperature
    50 grams apricot puree (or to taste)

    Combine the sugar, water in a small saucepan and warm over medium heat just until the sugar dissolves. Continue to cook, without stirring, until the syrup reaches 240◦F on a candy or instant-read thermometer. Once it reaches that temperature, remove the syrup from the heat.

    While the syrup is heating, begin whisking the egg whites at high speed in the bowl of your mixer using the whisk attachment. Whisk until soft peaks form.

    When the sugar syrup reaches the correct temperature and you remove it from the heat, reduce the mixer speed to low speed and begin slowly (very slowly) pouring the syrup down the side of the bowl being very careful not to splatter the syrup into the path of the whisk attachment. Some of the syrup will spin onto the sides of the bowl but don’t worry about this and don’t try to stir it into the mixture as it will harden!

    Raise the speed to medium-high and continue beating until the egg whites are thick and the mixture is cool to the touch (about 5 minutes or so).

    While the egg mixture is beating, place the softened butter in a bowl and mash it with a spatula until you have a soft creamy mass. With the mixer on medium speed, begin adding in two-tablespoon chunks. When all the butter has been incorporated, raise the mixer speed to high and beat until the buttercream is thick and shiny. At this point add passion fruit puree and beat for an additional minute or so.

    White Chocolate and Passion Fruit Mousse

    7 ounces white chocolate
    1 cup plus 3 tbsp. heavy cream
    1 tbsp. passion fruit puree

    Melt the white chocolate and the 3 tbsp. of heavy cream in a small saucepan. Stir to ensure that it’s smooth and that the chocolate is melted. Add the tablespoon of passion fruit to the chocolate and stir. Set aside to cool completely.

    In the bowl of a stand mixer, whip the remaining 1 cup of heavy cream until soft peaks form. Gently fold the whipped cream into the cooled chocolate to form a mousse.

    Assembling the Opéra Cake

    Place one square of cake on the baking sheet and moisten it gently with the flavoured syrup. Spread about one-third of the buttercream over this layer. Refrigerate until it hardens. Then spread a third of the white chocolate mousse on top.

    Top with joconde. Moisten with the flavoured syrup. Spread another third of the buttercream on the cake, refrigerate, spread another layer of white chocolate mousse on top and then top with the third square of joconde. Use the remaining syrup to wet the joconde. Spread the remaining buttercream on top of the final layer of joconde and then refrigerate and finish with the last layer of mousse. Refrigerate for at least 4 hours.

    In a bowl, mix a little bit of gold dust powder with a few drops of vodka. With a brush, paint some of the gold on top of the opera. Let it dry for a couple of minutes and cover the entire cake with clear glaze.


Post Title

Daring Bakers: Apricot, Passion Fruit and White Chocolate Opera


Post URL

http://mercymadame.blogspot.com/2008/05/daring-bakers-apricot-passion-fruit-and.html


Visit Merci Madame for Daily Updated Wedding Dresses Collection

Strawberry Soup with Vanilla Bean and Milk Sorbet


    My friend Erin, who is an avid gardener, and I took the kids out strawberry picking a couple of weeks ago. We drove out to Ft. Pierce to the D & D Farm where they have a beautiful farm with lots of produce to pick. Strawberry season in Florida runs from December through May, peaking in March and April. When I first moved to Florida six years ago and found strawberry stands on the side of the road in the middle of January, I thought that had to be some sort of scam. Strawberries in January?. But I didn't understand the Florida climate then and now it makes complete sense.

    So we headed out strawberry picking before the season was over. We also picked really sweet tomatoes and wanted to get peppers and eggplant but it was a scorching hot day and we just did not want to put the kids through it. So we picked the strawberries and the tomatoes, let the kids play in the dirt for a few minutes and ran for shelter. Yes, air conditioning... I do not know how people lived in Florida before air conditioning existed. Call me weak.

    When summer approaches there is nothing better than refreshing fruit soups and ice cream and sorbets. You will be seeing a lot of ice cream and sorbet recipes in this blog from now on. The bowl for my ice cream machine lives in the freezer now just in case I need it after a good catch of fruit.


    Strawberry Soup

    1 kg strawberries
    100 grams sugar
    Juice of half a lemon


    Place all ingredients in a bowl and cover it with plastic wrap tightly. Place this bowl over a double boiler. Once the water in the pan starts to boil, turn the heat to low and let the water simmer. Keep the bowl of strawberries over the simmering water. They will start to release their juice and this will be transparent.

    After an hour, strain the juice through a sieve and discard the wilted strawberries (you can mash them and eat them with ice cream). Refrigerate the juice collected until ready to assemble the dessert.

    Vanilla Bean and Milk Sorbet

    500 grams organic whole milk
    125 grams sugar
    3 vanilla beans, scraped
    150 grams heavy cream, soft peaks

    In a medium saucepan, bring the milk, sugar and vanilla beans to a boil. Remove the pan from the heat and let the vanilla beans infuse in the milk for about 30 minutes. Strain the milk and reserve the vanilla beans for another time. Refrigerate the milk for at least 4 hours.

    Churn the sorbet in the ice cream machine. In the meantime, whip the cream to soft peaks. When the milk base is almost done churning and forms ripples, add the whipped cream to the machine. Let the machine mix it all together but don't mix it too much otherwise your cream might turn to butter. This happens if you have a commercial ice cream machine. I find that with my home-use one, it is hard to over churn it just because my machine is not that fast. But just watch out for that.


    So long Florida strawberries, we will see you in December...

Post Title

Strawberry Soup with Vanilla Bean and Milk Sorbet


Post URL

http://mercymadame.blogspot.com/2008/05/strawberry-soup-with-vanilla-bean-and.html


Visit Merci Madame for Daily Updated Wedding Dresses Collection

Almond and Cherry Crumble and... Petit Suisse Part Deux


    A couple of weeks ago, I professed my love for petit suisse right here in this blog. I promised you that I would be back with more and my attempt to make them at home. Well here I am, not triumphant, as I had presumed. Let me explain.

    I had been searching for a petit suisse recipe for a long time but had not been very successful. Finally a few days ago, I did find a recipe to make fromage frais. This recipe indicated that this was also the method to make petit suisse and since the ingredients were easy to find and the method seemed fairly uncomplicated, I decided to go for it.

    There is something about making cheese, yogurt or bread at home that is very rewarding to me. Almost spiritual. Maybe because bacteria and yeast are living organisms that really require attention and depending on the hands of the person handling it, the results can be quite different. I like that. I like inconsistency, I like little flaws, I like the imperfection. Of course nowadays, there are machines that control all variables of the fermenting process resulting in a consistent product everytime, which is necessary in commercial production, but I still find the process of making it myself very rewarding.

    So the resulting cheese was basically plain unsalted, fromage frais. Very, very good flavor and texture but it was not petit suisse. I tried to research more about the petit suisse method and learned that heavy cream is added after the curd has formed. It was unclear to me how I was supposed to proceed after that. So if any of you know the answer, please... I need you!


    Cherries from California also showed up at Whole Foods which has made my week. I have been eating cherries all day long. They are as addicting as sunflower seeds. I cannot stop. Here is a little crumble I made for dessert a couple of nights ago. I topped it with a little bit of the fromage blanc and it was delicious.


    Fromage Blanc

    Yields about 200 grams of final product

    2 liters organic whole milk
    30 ml organic cultured buttermilk
    1/8 tablet of rennet
    30 ml water

    Sterilize a large pot by covering and boiling a small amount of water in it for 5 minutes prior to use. Pour in the fresh milk, then the buttermilk. Warm up stirring to a final temperature of 65°F. Meanwhile, dissolve rennet in 30 ml of cool water. Stir dissolved rennet into heated milk. Stir well to blend thoroughly. Cover and let sit undisturbed overnight at room temperature.

    The next morning, a soft curd should have formed; if not, let it sit until it does form which could take up to an additional 12 hours (mine was done overnight). When the curd is adequately formed, cut it into 1/2 inch cubes. Ladle cut curds into clean sterile cheesecloth suspended in a large strainer or stainless steel colander. Pour remaining whey through the cloth.

    The next day, open the cloth to reveal the cheese. I spooned it into ring molds but any cleaned yogurt container can be used to store it. I covered mine with a damp paper towel so the top doesn't dry out.

    Almond Crumble

    100 grams unsalted butter
    100 grams sugar
    100 grams flour
    125 grams almond flour


    Cream all ingredients together in an electric mixer. It will be crumbly. Place on a cookie sheet or in an air tight container and refrigerate over night. I normally make a large batch and freeze it and then I bake what I need.

    Cherry Filling

    200 grams pitted cherries
    25 grams flour
    30 grams sugar (depends on the sweetness of the fruit)
    1 tsp almond extract
    1/2 vanilla bean, split

    Combine all ingredients in a bowl. Divide filling into four ramekins and sprinkle with a generous amount of crumble. Bake in a 350F oven. Cover the ramekins with aluminum foil for the first 10-15 minutes, then let them finish baking for another 15 minutes or until crumble is golden brown.


Post Title

Almond and Cherry Crumble and... Petit Suisse Part Deux


Post URL

http://mercymadame.blogspot.com/2008/05/almond-and-cherry-crumble-and-petit.html


Visit Merci Madame for Daily Updated Wedding Dresses Collection

Mini Peach and Pistachio Frangipane Tarts


    I have been in a mood for tarts lately. In a mood for fruit tarts I should say. It must be Spring and the warm temperatures that make me want to eat fruit and more fruit. Last week I spotted the first peaches of the season at Whole Foods. Well, the first California peaches I should say. They were still a bit small but they were still sweet and soft. I had to get them. I have been craving stone fruits for way too long now.

    My friend Jill pointed out the other day that I use a lot of pistachios. Yes, I do, I admit it. It's a habit I developed working for my last chef. We used pistachios in everything and now, I cannot help myself. They add such color, flavor and texture that I always find something to add them to. Here, I am using pistachios once again.

    These tarts have a base of sable breton, a layer of pistachio frangipane, fresh peaches and mascarpone cream. Frangipane is traditionally made with almonds but it can be made with any ground up nut. Full of butter and sugar, it just melts in your mouth when served slightly warm.


    Sable Breton

    Makes 20 4-inch circles

    160 grams sugar
    160 grams salted organic butter
    4 organic egg yolks
    zest of half an orange
    225 grams unbleached all purpose flour
    15 grams aluminum free baking powder

    In an electric mixer, cream the butter and the sugar together. Add the egg yolks and the orange zest. Add the flour and baking powder combined until it comes together. Cover the dough with plastic wrap and let it rest in the refrigerator for at least 2 hours.

    Roll out to about 1/2" thickness and cut 4" circles with a round cutter.

    Pistachio Frangipane

    100 grams organic unsalted butter, softened
    100 grams sugar
    1 organic egg
    30 grams unbleached all purpose flour
    100 grams raw pistachios, ground to a fine meal

    Cream the butter and the sugar together. Add the egg. Scrape and mix well. Add the flour and the ground pistachios and mix until all ingredients are well incorporated.

    Place the frangipane in a pastry bag. Insert the sable breton disks in your mold and pipe the frangipane on top of the unbaked sable breton (about 1/4 inch thick). Bake the sable and the frangipane in a 350 degree oven until golden brown. Remove from molds when cool.

    Mascarpone Cream

    100 grams organic heavy cream
    50 grams mascarpone cheese
    20 grams sugar

    Whip all ingredients together until stiff peaks form. Using a spoon dipped in hot water, make quenelles with the cream and place on top of the tart base. Place slices of fresh peach next to it. Sprinkle with some chopped pistachios.


    Stone fruits are here and you will see them on this blog!

Post Title

Mini Peach and Pistachio Frangipane Tarts


Post URL

http://mercymadame.blogspot.com/2008/05/mini-peach-and-pistachio-frangipane.html


Visit Merci Madame for Daily Updated Wedding Dresses Collection

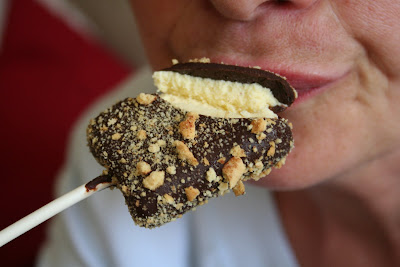
Mini Cookie Crumb Ice Cream Bars


    Looking through my photo files yesterday, I realized I have so many photographs of recipes I made when my parents were visiting in February that I have not yet posted. We really did cook quite a bit. That's what my mom and I like to do together and I document and photograph everything!

    These were little vanilla ice cream bars dipped in chocolate and sprinkled with cinnamon graham crackers. So easy to do and I thought I could leave you with some refreshing photos to end the weekend. I don't know about where you are but it is getting very warm here in South Florida so ice cream, sorbet and the beach is all I can handle.


    Happy Sunday to you!

Post Title

Mini Cookie Crumb Ice Cream Bars


Post URL

http://mercymadame.blogspot.com/2008/05/mini-cookie-crumb-ice-cream-bars.html


Visit Merci Madame for Daily Updated Wedding Dresses Collection

Lemon, Orange and Almond Savarin Cakes with Grapefruit Sorbet


    I have been feeling a bit nostalgic lately and I think it shows in my writing and the inspiration for my recipes...

    Almonds remind me of my grandfather. I remember him sitting quietly on an aqua-colored stool we had at the bakery while he peeled kilos and kilos of blanched almonds. Both hands working at once, snapping the hot, blanched almonds between his fingers to remove the skin. Prune-like skin on his finger tips. I remember that clear as day.

    This was done mostly around Christmas time to make marzipan and turron. The almonds arrived unshelled but with the skins still on them. They were quickly blanched in boiling water and placed on top of towels to drain while we peeled the skins off the almonds while they were still warm. This becomes an annual ritual and it is still done today.

    My grandfather was a slim, meticulous and quiet man. Always liked to be surrounded by family. After all, my grandmother and he raised eight children. The bakery doors were always open and people would come and go all day long. Friends would pop in to say hello and move on with their days. My grandparents always welcomed everyone.

    I grew up in the bakery. That's where we would go after school, that's where we spent our weekends but I never got to work alongside my grandfather. He started as an apprentice in the renowned patisserie Martina Zuricalday in Bilbao when he was 14 years old. He opened his shop in 1949 and he retired when I was still a child. I often times think how I would have loved to stand next to him and watch him do his craft. A true master. So this recipe is dedicated to the memory of my Aitite Angel who I adored with all my heart.


    These cakes also known as pain de genes are made with pure almond paste, eggs and a lot of citrus zest. There's barely any flour so they are leavened by the air incorporated into the eggs. Very, very spongy and very, very citrus-y.

    Of course I had to make some sorbet to go with it because it is scorching hot in Florida and since I had some grapefruit juice in the refrigerator, I thought I could make a sorbet with it and complete the citrus theme with a good finale. I used some of the sorbet to accompany the cake but I also piped some into shot glasses for a sorbet popsicle later on.

    When you read through the sorbet recipe, I know many of you will just give up on me completely. Yes, I am using ingredients that are not available in the regular supermarkets. I apologize for that. I realize not everyone has access to these (I got them from L'Epicerie) but you must understand that this grapefruit recipe is the best one I have ever tried and so THIS one is the one I had to make. The atomized glucose which is powdered glucose, makes it completely creamy... hard to explain. There is no crystallization at all. For a conventional grapefuit sorbet recipe, you can use this one.

    Lemon, Orange, Almond Pain de Genes

    Makes a dozen savarins

    200 grams almond paste (50% almond)
    4 organic eggs
    30 grams unbleached all purpose flour
    3 grams baking powder
    80 grams organic unsalted butter, melted and cooled
    Zest of 1 orange
    Zest of 1 lemon

    In the bowl of a mixer, cream the almond paste, zest with 2 eggs (use paddle attachment at first). When this mixture has turned to a paste, add the rest of the eggs and switch to the whip attachment. Whip the almond paste and eggs to a ribbon (about 5 minutes). Add the flour and baking powder and mix. Add melted butter.

    Place the batter in the refrigerator overnight. Place it pastey bag and pipe into savarin mold. bake at 350 for about 15 minutes or until golden brown.

    Grapefruit Sorbet

    250 grams unsweetened grapefruit juice
    110 grams sugar
    60 grams powdered glucose (atomized glucose)
    200 grams water
    2 grams sorbet stabilizer

    Place water in a saucepan and heat slightly. Add the atomized gluzose, whisk and bring to a boil. Mix the sugar and the sorbet stabilizer in a bowl and add to the boiling syrup. Whisk and return syrup to a boil. Remove from heat.

    Refrigerate the syrup for at least 4 hours. Add the grapefruit juice to the syrup and churn in ice cream machine. Freeze.

    Candied Lemon Slices

    1 lemon
    50 grams sugar
    50 grams water


    Make a simple syrup with water and sugar. Cut the lemon into very thin slices, dip them in the cooled simple syrup and place them on a silicon mat. dry the lemon slices in a very low oven (about 200F) for about an hour. Store them in an air-tight container.


    This dessert is my entry for this month's Sugar High Friday which is a blogging event founded by Jennifer of The Domestic Goddess and this month's challenge is hosted by the lovely Helen of Tartelette.

Post Title

Lemon, Orange and Almond Savarin Cakes with Grapefruit Sorbet


Post URL

http://mercymadame.blogspot.com/2008/05/lemon-orange-and-almond-savarin-cakes.html


Visit Merci Madame for Daily Updated Wedding Dresses Collection

Creme Bulgare, Christine Ferber and Petit Suisse Nostalgia


    This post is about two loves of mine: yogurt and Christine Ferber...

    Growing up, we ate a lot, A LOT of yogurt. Mainly plain whole milk yogurt sweetened with fruits, a bit of sugar or honey. Flavored yogurts from Danone (or Dannon as it is known here) were a treat, eaten as dessert. The fun about getting these flavored yogurts were all the "toys" that came with them. I think these must have been the first real marketing techniques applied to food products in Europe and of course, they were targeted to children. My favorite were the sticker albums usually in reference to some cartoon show that was popular at the time. I remember "Maya the Bee" like it was yesterday.

    Our other childhood treat was petit suisse. If you grew up in Europe or even walked the yogurt and cheese section of European supermarkets, you have certainly tried or at least seen these little delicacies. Not to be confused with yogurt, petit suisse is an unsalted, unripened, fresh, cow's milk cheese originally from Normandy but widespread in Europe now. It is sold in six pack mini containers with ridges on the side and the cheese is usually wrapped in a thin piece of paper. Again, this was one of the staple snacks growing up. There were different flavors, strawberry, chocolate, banana... but my favorite was always plain.


    I have looked and looked everywhere but I have not been able to find any near me so yes, I will be making my own petits suisse. Stay tuned for that one. The nostalgia for this rich and creamy texture is what inspired me to make some yogurt of my own but instead of milk, I used heavy cream, 40% butterfat to be exact. Thick like Greek yogurt but not as tangy. Sweet without any added sugar.

    My second love is Christine Ferber. I learned about her a few years back and in my eyes, she is the quintessential seasonal pastry chef. All her books and recipes are always organized by season and she focuses very much on fruits. Her books "Mes Confitures" and "Mes Tartes" are two of my favorite pastry books on my shelf and I often times go to them for inspiration. I love her rustic, simple and natural approach to food. It resonates with me and how I like to eat. This apple and rhubarb jam I made to go with the creme bulgare is inspired by one of her recipes.


    Creme Bulgare

    1 liter of organic heavy cream
    1 envelope (5 grams) of freeze-dried yogurt starter

    In a saucepan, bring the cream almost to a boil (about 82 degrees Celsius). Remove from heat and let it cool to 42 degrees Celsius. Mix a small amount of the lukewarm milk with the yogurt starter. Add it to the rest of the cream and whisk lightly.

    Pour the cream into your yogurt jars and follow the manufacturer's instructions. A thin layer of fat will rise to the top of the yogurt forming a skin. That's normal and that is actually the best part in my opinion. Refrigerate once the yogurt is set.


    Rhubarb and Apple Jam

    makes a medium jar of jam

    100 grams rhubarb, small dice
    100 grams Granny Smith apples, small dice
    200 grams sugar
    50 grams apple juice
    1 Tbs fresh lemon juice

    Cut the rhubarb in small dice. Peel and core the apples and cut them into small dice. Combine the fruit, sugar, apple juice and lemon juice in a bowl and let it macerated in the refrigerator overnight.

    Next day, strain the mixture through a sieve. Bring the leftover syrup to a boil and cook to 221 degrees Farenheit. Add the macerated fruit and bring to a boil again. Skim any impurities, reduce heat to medium and cook for another 10 minutes. Pour the jam into jars and let it cool. Serve the creme bulgare with the rhubarb jam.

    Candied Rhubarb Strips

    75 grams sugar
    75 grams water
    1 rhubarb stalk

    Make a simple syrup by boiling the water and the sugar. Turn heat off once the sugar is dissolved.

    Cut thin strips of rhubarb with a vegetable peeler. Dip the rhubarb in the cooled simple syrup and place the strips on a silicon mat. Dry them in a 200F degree oven for about an hour. While they are still warm and pliable, twist them. They will cool quickly and as soon as they cool, they will hold their shape. Store in an air-tight container.


    Stay tuned for part II and my attempt to make petits suisse...

Post Title

Creme Bulgare, Christine Ferber and Petit Suisse Nostalgia


Post URL

http://mercymadame.blogspot.com/2008/05/creme-bulgare-christine-ferber-and.html


Visit Merci Madame for Daily Updated Wedding Dresses Collection

Canneles and Raspberry Financiers... Little Camping Snacks


    First of all, I have to thank all of you who left beautiful words in my blog. Very inspirational and they have not gone unnoticed....

    We just returned from a camping trip. It was a hot, but perfect Mother's Day camping trip. It is just a joy to see my little boy's face every time we tell him we are going to the pool or just to watch him play in the dirt. I think life gave me a boy for a reason. I get to rediscover nature through his eyes and how anything and everything is a potential toy. Tree branches make great swords!

    Our camping trips always seem to revolve around food. We plan our meals a week in advance, making grocery lists, taking special trips to Whole Foods. Snacks and sweet treats are very, very important, so in preparation for this trip, I made a batch of canneles and raspberry financiers. Small, one bite treats.


    Canneles are the quintessential petits fours from Bordeaux. They are not a cookie and they are not cake. It's almost like a crepe batter that is baked in tin molds to a dark crusty exterior and a soft, custard, chewy interior. They are flavored with vanilla and rum... very very fragrant. Traditionally, these canneles tin molds are coated with beeswax, but I used mini silicon molds. Their exterior is not as shiny when beeswax is not used but they are just as flavorful and the texture very similar.


    The raspberry financiers are C's favorite. In fact, he ate most of them before we even left for the trip. There's something about brown butter, almonds and raspberries together... Most of the time, I bake a large base and I bake them as I need them. The batter will stay good in the refrigerator for about 3-4 days.


    Canneles Bordelais

    Makes 3 dozen mini canneles

    225 grams milk
    30 grams butter
    75 grams milk
    1 egg yolk
    90 grams flour
    24 grams rum
    1 vanilla bean, split and scraped
    150 grams sugar


    Boil the first two ingredients together. In a separate bowl, whisk the remaining of the ingredients together and slowly add the boiled milk and butter. Whisk until there are no lumps. Refrigerate for at least 24 hours.

    Pour the batter into the canneles molds and bake at 350 degrees for about 45 minutes or until dark brown exterior. While they are baking, the batter will puff up and it will seem like the canneles are going to fall out of the mold. Don't worry, that's normal and they will go back down.

    Raspberry Financier

    Makes 3 dozen mini finaciers

    120 grams egg whites
    125 grams sugar
    55 grams flour
    55 grams almond flour, toasted
    150 grams brown butter
    25 grams fresh or frozen raspberries (I used frozen ones this time)


    In a saucepan, place the butter and heat it until the milk solids start to brown and it starts to smell nutty. Be careful not to burn it though. Remove the pan from heat and strain the butter. Let it cool.

    In the meantime, toast the almond flour in a 325 degree oven until lightly brown. Let it cool.

    In a bowl, whisk together the egg whites, sugar, flour, almond flour, brown butter. Let this mixture rest in the refrigerator overnight. The next day, add the raspberries into the financier base and whisk a bit to break them up. Pipe the mixture in the financiers molds and bake at 350 degrees for about 15 minutes or until lightly golden.


    Happy Mother's Day to all of you mothers and non-mothers who keep on making this a better world to live in!

Post Title

Canneles and Raspberry Financiers... Little Camping Snacks


Post URL

http://mercymadame.blogspot.com/2008/05/canneles-and-raspberry-financiers.html


Visit Merci Madame for Daily Updated Wedding Dresses Collection

Chocolate Ganache and Pistachio Creme Brulee... Two Ways


    I made some chocolate and buttermilk cupcakes for a party last week. I had some cupcakes leftover that were not iced so I decided to play around with them. I wanted to use chocolate and pistachio flavors but build different kinds of cakes. If I were as witty and clever as Cakespy, I would have a petit gateau and a cupcake faceoff. (Hey Jessie, are you up for it?).... Unfortunately, I'm not that funny so it would turn out to be pretty silly. But I did want to play around with different looks. The petits gateaux look a bit more European, but the cupcakes are fun with the buttercream swirls.

    First of all, I decided that I wanted a creamy center and a crunchy exterior so I went for a creme brulee custard that I flavored with pistachio paste and baked in mini muffin silicon pans. Then I made a very, very rich chocolate ganache with 70% chocolate that I used inside and to cover the outside of the mini cakes. For the cupcakes, I used buttercream with pistachio paste. To finish both of them, I added some chopped salted pistachios which really make a big difference. The contrast between the rich chocolate and the salted pistachios is what makes this cake in my opinion. I will briefly describe how I built each one and the recipes will follow at the end.


    Chocolate Pistachio Cupcakes

    With a 1 1/2-inch diameter cookie cutter, cut out a circle of cake out of the top of the cupcake. Insert the frozen pistachio creme brulee disk. Top with a little bit of chocolate ganache and place the cutout piece of cake back on top. Press down gently.

    Place the pistachio buttercream in a pastry bag fitted with a number 8 plain pastry tip. Pipe the buttercream on top of the cupcake making large swirls. Top with a generous amount of chopped salted pistachios.


    Chocolate and Pistachio Petits Gateaux

    Remove the cupcake from the baking paper. Using a cookie cutter, make a perfect cylinder and then cut the little cake into three layers horizontally. Place the first layer down, spread a thin layer of chocolate ganache on top, place a frozen disk of creme brulee on top, top with another disk of cake, more ganache, another layer of creme brulee and finish with the last layer of cake. Press down gently.

    Hold the cake down gently and with a small offset spatula, ice the sides and top of the cake with ganache. Press the chopped pistachios into the sides and top of the cakes.


    Here are the recipes for the different components...


    Chocolate Buttermilk Cupcakes

    makes about 30 cupcakes

    2 sticks butter, softened
    1 cup sugar
    1 cup brown sugar
    4 eggs
    6 oz unsweetened chocolate, melted
    1 cup buttermilk
    1 tsp vanilla
    2 cups flour
    1 tsp baking soda

    In an electric mixer, cream together the butter, sugar, brown sugar with the paddle attachment. Add the eggs one at a time. Add the melted chocolate and mix until well incorporated. Scrape the bowl. Add the vanilla and half of the buttermilk. Add the flour and baking soda, mix and finish with the remainder of the buttermilk. Mix until well incorporated. Scoop into baking cups and bake at 350 degrees for about 20 minutes.

    Chocolate Ganache

    100 grams heavy cream
    100 grams 70% chocolate, finely chopped

    Bring the heavy cream to a boil and pour over the chocolate. Mix slowly starting from the center until all incorporated and creamy. Let it cool.

    Pistachio Creme Brulee

    1 cup heavy cream
    2 egg yolks
    25 grams sugar
    35 grams pistachio paste


    Whisk together the egg yolks and the sugar and the pistachio paste. Slowly add the heavy cream and whisk. Strain through a fine sieve to eliminate any egg particles or pistachio chunks.

    Pour into a mini muffin silicon pan that is on top of a sheetpan, about half an inch high. Add hot water to the pan and bake in a 300 degree oven for about 15 minutes or until center set. Drain water from the pan and place it in the freezer until the brulees harden.

    Pistachio Buttercream

    50 grams egg whites
    100 grams sugar
    150 grams butter
    50 grams pistachio paste

    Mix the egg whites and the sugar and place them over a double boiler while you whisk them together. The sugar will start to dissolve and the egg whites will start to turn white and fluffy. Continue whisking until the egg whites feel hot to the touch.Transfer the bowl to the electric mixer and whip in high speed until light and fluffy and the bottom of the bowl doesn't feel hot anymore. About 3-5 minutes.Start adding the softened butter by the tablespoon. Keep adding more butter as it is incorporated into the meringue. It might look like it is curdling but don't worry, keep mixing. When is well mixed, add the pistachio paste.

    The layer of creme brulee inside is so thin that it will thaw out in no time. Serve both the cupcakes and the petits gateaux at room temperature.


    Post Script.... this photo describes it all.


    Some mornings I wake up and I wonder if this little blog of mine has any meaning. I love my little blog. I treasure the time I devote to it everyday by thinking about what ingredients are available, what I am going to make with them, how I will photograph them. It really has changed my life. But at the same time, I wonder if this isn't a bit too indulgent. The last few days I have been really thinking about it after reading this, this, this and in this one, Nadia expresses what I am feeling right now. I'm still trying to figure out how to create through food without the guilt that comes with it.


    Thank you for reading...

Post Title

Chocolate Ganache and Pistachio Creme Brulee... Two Ways


Post URL

http://mercymadame.blogspot.com/2008/05/chocolate-ganache-and-pistachio-creme.html


Visit Merci Madame for Daily Updated Wedding Dresses Collection

Pink Peppercorn Macarons with Strawberry Sorbet


    This was the recipe I had planned to make while Shuna from Eggbeater was here in Florida visiting her family. As soon as I read in her blog that she was coming, I contacted her and asked her if she would like to join me in my kitchen for a baking session. All I could think about were the beautiful photos that would come out of that encounter. I always feel sort of lonely in the kitchen. I like company and often times I wish I had a photographer buddy that could accompany me in my experiments. I couldn't wait to meet Shuna. I love her blog... she makes me think. So Shuna kindly responded to my email and we agreed to meet on a Friday morning at my house.

    But Thursday night, life took a turn, my son got sick and we were never able to meet and bake. I was really looking forward to it and felt very disappointed but it was nobody's fault. We did meet later that weekend but no baking was involved. Just great conversation and the best sweet kugel I have ever had.


    I came up with the idea of pink peppercorn macarons while walking by the meat counter at Whole Foods. It had been a long time since I had thought about or cooked with pink macarons but as soon as I laid eyes on the little jar, I remembered their slightly sweet and spicy aroma. Perfect, I thought, I will fill them with strawberry sorbet. Remember my post for strawberries and pepper? That's where the inspiration came again.

    The smell that came out of the oven while the macarons were baking was incredible. I couldn't wait for them to cool down enough to try them. I tried one by itself and it was perfect. Sweet, crunch, chewy but a little spicy kick at the end. Subtle.


    Pink Peppercorn Macarons

    180 grams almond flour
    240 grams powdered sugar
    140 grams organic egg whites, aged
    3 grams egg white powder
    2 grams fine sea salt
    80 grams sugar
    a few drops of all natural red food coloring
    Pink peppercorns, ground

    Make sure that the egg whites have been separated from the egg yolks the night before. This bit of aging really makes a difference in the macaroons.

    In a large bowl, sift together the almond flour, powdered sugar and sea salt. Set aside.

    Whip the egg whites with the egg white powder until very fluffy, almost fully whipped. Start adding the vanilla sugar slowly while whipping. Whip to stiff peaks but not too much or the meringue will dry out. We want semi soft "ripples" still in the meringue. Add as much food coloring to the meringue as you like. I tend to like soft colors but some prefer really vibrant ones.

    Add the meringue to the almond flour mixture and fold with a spatula until a shiny mass forms. We want to achieve a batter that makes ribbons. You might have to test it to see if it's done. Pipe a small amount on your sheetpan. If it keeps a little bit of a top when piped, then you have to mix it a bit further, if it spreads really fast, you have gone too far and your macaroons will turn out flat.

    When you have the right consistency, place the mass in a pastry bag with a number 5 tip and pipe small rounds onto sheetpans lined with parchment or silpat. While the tops are still wet, sprinkle the ground pink peppercorns on top. Let them dry at room temperature for at least 45 minutes to an hour.

    Have the oven preheated to 350 degrees. Place one sheetpan in the oven at a time and reduce the temperature to 300 degrees. Bake for 10 minutes and rotate sheetpan and bake for another 10 minutes. Test to see if they are done by picking one up and seing if it still sticks to the paper or not.

    Strawberry Sorbet

    1 1/2 cups fresh strawberry puree (I didn't strain it)
    Juice of half a lemon
    1/2 cup sugar
    1/4 water

    Make a syrup with the water and the sugar by quickly boiling it until the sugar dissolves. Remove from heat right away. Let the syrup cool in the refrigerator. Add the strawberry puree and the lemon juice and churn in ice cream machine. Freeze.

Post Title

Pink Peppercorn Macarons with Strawberry Sorbet


Post URL

http://mercymadame.blogspot.com/2008/05/pink-peppercorn-macarons-with.html


Visit Merci Madame for Daily Updated Wedding Dresses Collection

Lazy Day Coffee and Chocolate Mousse


    It's been a lazy weekend. No plans, no baking, no noise. It reminded me of summer days during my childhood when everyone after lunch would go to their rooms and nap for an hour. We would open the windows and shut the blinds to block out the sun but fresh air would come in. No noise on the streets, just peace.

    This is one of those desserts I leave for a last minute dinner or a lazy afternoon. It takes literally two minutes and I always tend to have these ingredients in my kitchen. This is my trusty, go to mousse that I use to fill cakes if I'm in a hurry or in this case, to eat by itself with some whipped cream.

    I actually made these a few weeks ago when my parents were still here and that's when I took the photographs. But I had a couple cups leftover in my freezer so yesterday afternoon, while everyone napped, I sat in the den, my cat Luca next to me and I ate one all by myself. I really appreciate now those rare moments that I have to myself.


    Coffee and Bittersweet Chocolate Mousse

    300 grams heavy cream
    100 grams 70% chocolate
    Coffee extract or dissolved instant espresso, to taste

    Whip the heavy cream to soft peak. In the meantime, melt the bittersweet chocolate over a double boiler. Add some of the cream to the chocolate and whisk vigorously to avoid the chocolate to harden. Slowly, fold this mixture into the rest of the cream. Flavor with coffee extract. If you don't have coffee extract, you can use instant espresso (only use a little bit of hot water to dillute it or make your own espresso and reduce it a little bit to concentrate the flavor).

    Pipe the mousse into your coffee cups and serve with whipped cream, ground cinnamon and cocoa powder.


    I was experimenting with my camera in the afternoon light. I like the reflections and... if Luca's face doesn't say "lazy afternoon" I don't know what does...

    On another note, I received two awards this weekend. I want to thank Alfie from Cabbage, Roses and Cupcakes for passing on the Arte Y Pico award to me and Diva from SugarBar for the You Make My Day award. I'm flattered. Thank you very much Alfie and Diva.


    Eta amaitzeko... zorionak Jokintxu... zuri beste mosu handi, handi bat gure partez!


    Update: So I just received my third award this weekend. This one comes from Gretchen at Canela y Comino. Thank you very, very much Gretchen. I am feeling a bit overwhelmed. Thank you!

Post Title

Lazy Day Coffee and Chocolate Mousse


Post URL

http://mercymadame.blogspot.com/2008/05/lazy-day-coffee-and-chocolate-mousse.html


Visit Merci Madame for Daily Updated Wedding Dresses Collection
Popular Posts

My Blog List

Blog Archive